


The Star Stitch is a beautiful crochet stitch that adds a lovely texture and design element to your crochet projects. People often ignore patterns that contain this stitch because when the instructions are written, they are confusing. But it’s not a difficult stitch and video is the perfect way to learn to do this stitch! This video demonstrates the ‘no gap’ version. Many instructions leave you with an unsightly gap between the last star and the final stitch of the row. This technique shows you how to eliminate those gaps. The Star Stitch can be done with any type or size of yarn and the appropriately sized hook for the yarn. I hope you enjoy this Drunk Dog Creative Stitch Tutorial which includes both written instructions and the tutorial video (I really recommend just watching the video).
TIPS and HINTS
Here are a few tips to make this stitch easier:
Use a hook with a pointed head on it. A rounded top of your hook will be harder to slip under the bars of loops and into tighter placements in this stitch. In the photo below, the hook (Etimo Tulip) on the left is pointier than the hook on the right (Furls Streamline Resin). The Etimo Tulip is mostly a tapered hook (in reality it’s a hybrid between tapered and inline) while the Furls Streamline Resin is an inline hook.

Loosely plied yarns (cotton, bamboo, etc) are harder to work with because the ply can split easily, making it hard to put your hook cleanly into the right places. The photo at the top of this blog (the mint green) is a bamboo yarn. The bamboo is beautiful because it is slippery and glides easily, but it also splits easily. Tightly plied yarns are easier if you’re just learning this stitch.
My ‘mantra’ to remember stitch placement is: EYE, BAR, OLD STITCH, NEW STITCH 1, NEW STITCH 2. This might be helpful to you too.
Instructions
The Star Stitch is worked in a two row repeat. The first row creates most of the spikes of the star, the second row creates the rest of the spikes. The Star Stitch has a distinct front and back that are different. Row 1 creates the front of your finished fabric. Keep that in mind if you’re adding this into a pattern with other stitches. The beginning star stitch on row 1 is done differently depending on whether you are working into a foundation chain or an established fabric with other rows. The beginning star is also different to the rest of the row. The video below demonstrates how to do this stitch. It is easier to learn this stitch from the video than from the written instructions, but these are also given below.
Abbreviations and Notations used (USA Terms):
- ch = chain
- slst = slip stitch
- hdc = half double crochet
- yo = yarn over
- ( ) = repeat the instructions within the parenthesis the number of times indicated
- [ ] = extra information to help you
First Row When Working into a Foundation Chain
Foundation Chain – Ch the number of chains to give you the length you need, in multiples of 2. When your chain is the length you want, add 4 more chain stitches.
Beginning Star when using a foundation chain – insert hook into 2nd ch from hook, yo and draw up a loop, (insert hook into next ch yo and draw up a loop) 4 times, [there are now 6 loops on your hook], yo and draw through all 6 loops on hook, ch 1 to finish.
Completing the row of star stitches – [the first four loops are made into the existing star with the last two in the next two chains in the foundation chains. See photo below.] insert hook into the ‘eye’ of the star just made, yo and draw up a loop, insert hook under the front bar of the last loop you pulled up in the previous star stitch, yo, pull up a loop, insert hook into the last ch that you worked into to make the previous star stitch, yo and draw up a loop [there are now 4 loops on the hook], insert hook into the next new ch in the foundation chain, yo and draw up a loop, insert hook into the next new ch in the foundation chain, yo and draw up a loop, yo and draw through all six loops on the hook to close the stitch. Repeat these instructions to the end of the row.

Ending the first row of star stitches – to finish the row, insert hook into eye of previous star stitch, yo and draw up a loop, insert hook into ‘old stitch’ [the last ch you worked in for the previous star stitch], you know have 3 loops on the hook, yo, draw through 2 loops, yo and draw through 2 loops. Your row is now ended. Turn but do not do a turning chain!

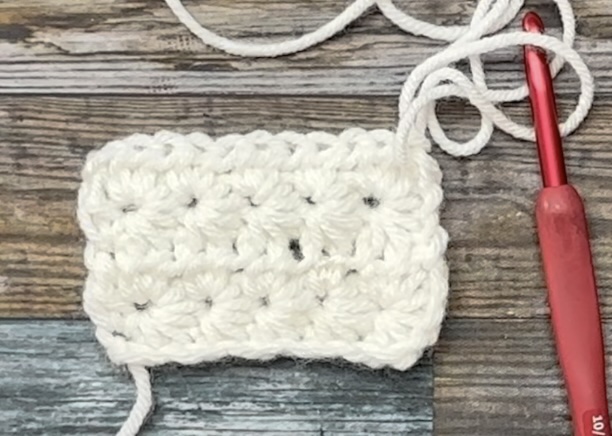
The photo above is obviously not at the end of the row, but it does illustrate the hook placement for the stitch that you use to end the row.
Second Row
The second row is always the same whether you began with a foundation chain or worked row 1 into an existing row of stitches. Do not use a turning chain for this row. hdc in each ‘eye’ of the stars created in the row below to the end of the row. Ignore all other stitches, only work into the ‘eye’. at the end of the row, place your hook into the chain at the end of the row, ensuring you work through two bars of the ch and do a slip stitch,

First Row When Working into an Existing Row (ie not a foundation chain)
Beginning star stitch – complete previous row, turn, and ch 3. Insert hook in 2nd ch from hook, yo and draw up a loop, insert hook in 3rd ch from hook, yo and draw up a loop, insert hook in first st of row, yo and draw up a loop, insert hook into next st in row, yo and draw up a loop, insert hook into next st in row, yo and draw up a loop, yo and draw through all 6 loops on hook, ch to finish st.
Completing the row of star stitches – [this is done the same as for working into a foundation chain except you insert your hook into the stitches instead of chains (obviously).] insert hook into the ‘eye’ of the star just made, yo and draw up a loop, insert hook under the front bar of the last loop you pulled up in the previous star stitch, yo, pull up a loop, insert hook into the last st that you worked into to make the previous star stitch, yo and draw up a loop [there are now 4 loops on the hook], insert hook into the next new st in the foundation chain, yo and draw up a loop, insert hook into the next new st in the foundation chain, yo and draw up a loop, yo and draw through all six loops on the hook to close the stitch. Repeat these instructions to the end of the row. Finish the row as per instructions above for “ending the first row of star stitches”.
So that’s the star stitch! I hope you enjoyed this tutorial. I would love to see what you are making with this stitch. Please follow Drunk Dog Creative on socials to keep an eye out for a pattern I’ll be releasing soon that uses this stitch! Why not also join the Drunk Dog Creative Maker’s Gallery on Facebook? This is a new group I’ve created for you to share your wonderful creations that you’ve made from my patterns and tutorials!
Thank you and happy hooking!

Marcus, Polly and Hugo, the dogs of Drunk Dog Creative, want to remind you to subscribe to this blog, share with your friends, and follow Drunk Dog Creative on all the socials.
Woof woof. Sit. Stay. Follow us. Good human.
AND ON RAVELRY!


Leave a comment