

Here’s a celver fun fold card design that you can adapt for any occassion. Choose any combination of cardstock and patterned papers you want – mix two, three, or even four different patterns! Then decorate it with stamped images, sentiments, and embellishments. There is so much you can do with this fun fold card design!

The video has two parts to it… the first part gives the cut plan and assembly instructions for the structure of the card. This is what you need to create the card itself. The second part, which starts at about the 18 minute mark, is about decorating the card. I demonstrate two useful techniques in that part of the video: how to blend your ink with blending brushes… and how to use masks to add depth and dimension to your stamping!

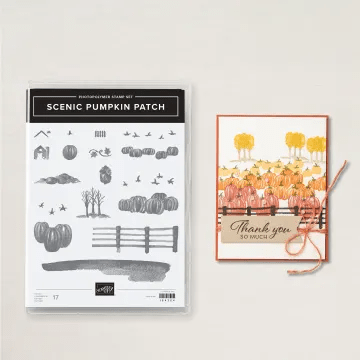
While I live in Australia, I am originally from the USA and have a lot of family and friends there who I will be sending Thanksgiving Cards to. So, the card for this tutorial is designed for that holiday, but it can be used for any occassion! The stamp set I used – the Scenic Pumpkin Patch Photopolymer Set – would make adorable rustic, country themed cards! This set is available for a limited time as part of the new Stampin’ Up! 2024 September-December Mini Catalogue.
That said, your only limitation for this card is your own imagination! Mix up the colours, the patterned papers, the stamps, sentiments, and embellishments to make it uniquely your own! Check this encouragement card I made using the same structure but totally different papers and stamps.


The above card uses Berry Burst as the main cardstock colour and patterned papers from the Full of Life and Thoughtful Journey Designer Series Paper sets.
The instructions below are in both Metric and Imperial. The finished card is also slightly smaller than the normal metric A6 card (Australia) and the A2 card (USA). They will still fit in the standard envelopes for those sizes though. There is a video tutorial as well as written instructions and a supply list at the end of the post if you want to browse some of the products used. Happy Inking!
Video Tutorial
Cut Plan
| Cardstock | Metric (mm) | Imperial (inches) |
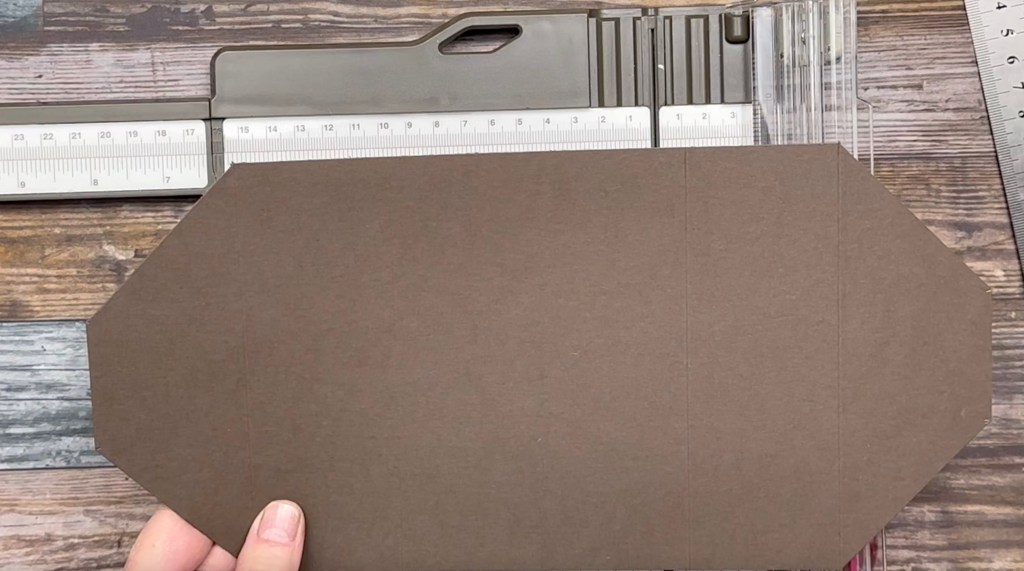
| Card Base (Early Espresso) | 297 x 143 scored at 50 and 100 from the left edge and from the right edge. | 12 x 4-1/4 scored at 2″ and 4″ from the left edge and from the right edge. |
| DSP 1 (cut 4) | 45 x 138 | 1-3/4 x 5 |
| DSP 2 (cut 2) | 45 x 133 | 1-3/4 x 4-3/4 |
| Inside Mat (DSP of your choice) | 95 x 138 | 3-3/4 x 5 |
| Writing Panel (Very Vanilla) | 85 x 128 | 3-1/2 x 4-3/4 |
| Belly Band (Early Espresso) | 245 x 45 score at 65 from one edge and 75 from the other edge. | 10 x 2 score at 1/2″ from one edge and 1″ from the other edge. |
Assembly
Using a ruler and pencil, mark the left edge of the Card Base at 50mm (2″) from the top and from the bottom. Repeat on the right edge.
Align the corner point and the mark in the cutting channel of your paper trimmer and cut the triangle piece off the top and bottom of each edge. Erase any pencil marks.
Take the 2 pieces of DSP 2 and decide which one will go on the left of the card front and which will go on the right of the card front. Using a ruler and pencil, mark 45cm (1.75″) from the top and the bottom on the left edge of the left piece and the same on the right edge of the right piece.
Using your paper trimmer, cut the corners off at an angle, aligning the corner with the pencil mark. Erase any leftover pencil marks.

Fold the card base on the score lines so that the angled strip forms the front of the card. The score line at 50mm (2″) is a mountain fold while the 100mm (4″) score line is a valley fold. Use a bone folder to sharply crease all the folds.
Taking two of the four DSP 1 pieces, affix them to the BACK of the card base to the panels of the card base formed between the score lines at each edge.
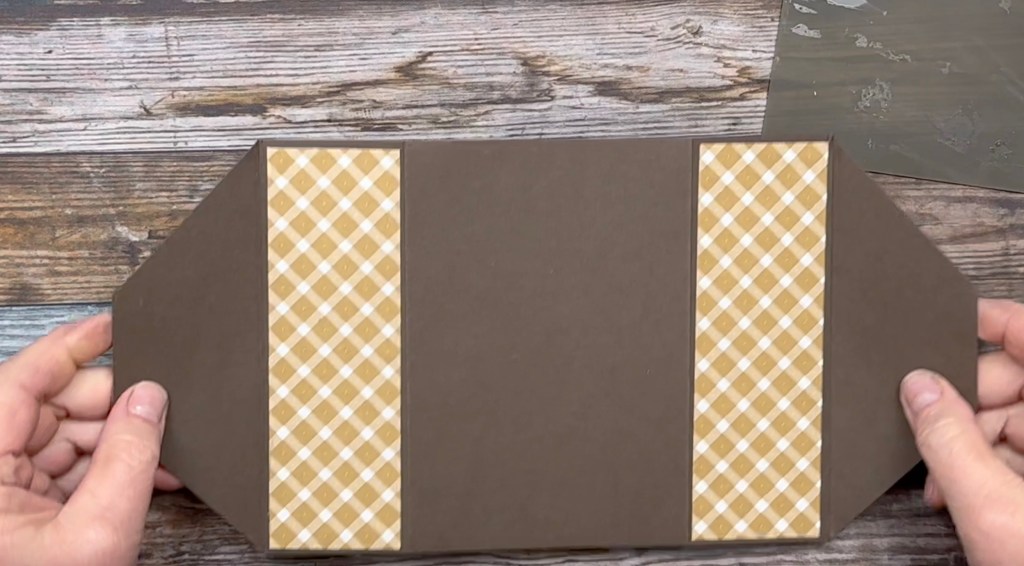
Now using the two pieces of DSP 2 that you cut angles on, align them to the strips of the cardbase that forms the front of the card and affix them in place (sometimes glue is easier to use here than glue tape as it gives you time to wiggle them a little to get them centred.

Taking the other two pieces of DSP 1, affix them to the same panels on the INSIDE of the card base. You can place them so the same pattern as the previous pieces shows, or flip them over to use the reverse pattern here, or even use an entirely different DSP here. Be creative!
Using the Inside Mat piece, affix it to the centre of the inside of the card base. Affix the writing panel to the mat. There is an opportunity to be creative here – you can use the SU Best Trio punch to cut the top corners off the panel to make it look like a tag or you can use the punch to create fancy corners. Use your imagination and whatever dies or corner chompers you have at hand!

Fold the belly band along the score lines. Apply glue or tape to the top of one end and the underside of the other end and affix them to each other. Fold the card along its fold lines and slip the band over the card to hold it closed.
The structure is now assembled and ready for decoration!
Decoration and Embellishment
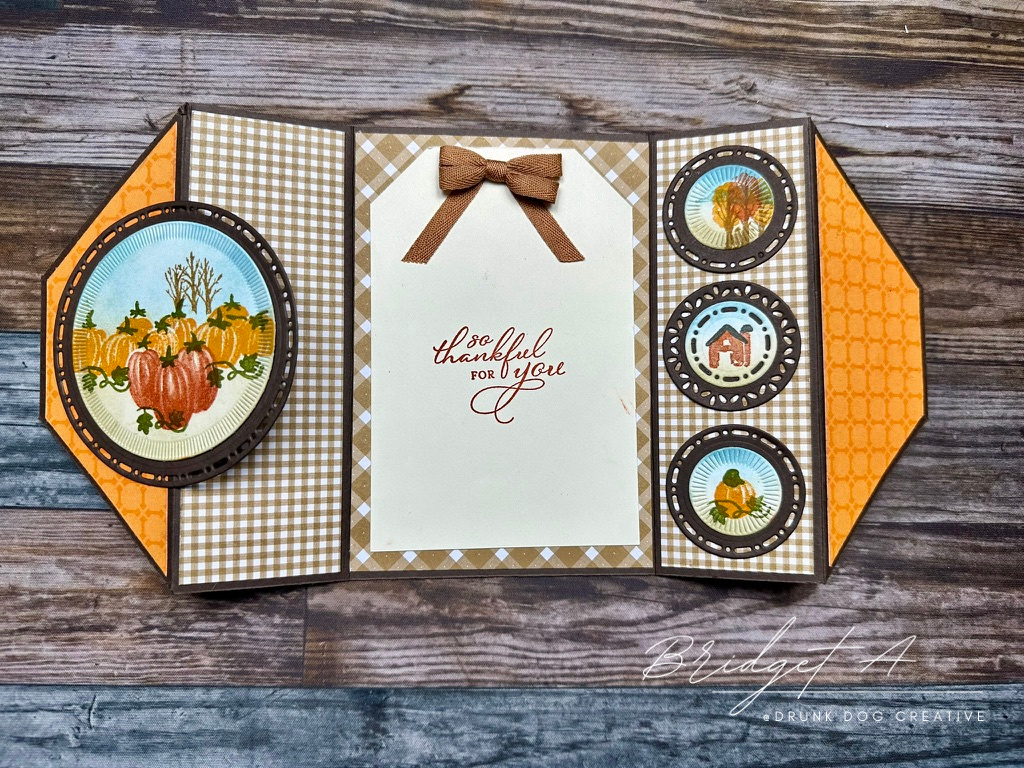
This is where you get to use your imagination! Go wild here! If you do want to see how I decorated the card in the photos and video, then the second part of the video (after about the 18 minute mark) shows how I did this. I used the new Scenic Pumpkin Patch photopolymer stamp set and some circle dies to make some rural/rustic scenes in order to use this card for Thanksgiving. I also decorated the belly band with a Thanksgiving sentiment. But this card can be decorated any way you want for whatever occasion you want to use it for.
The video also demonstrates two useful techniques:
- Using the mini blending brushes to create backgrounds for your stamped images
- Using masks to stamp a layered scene with depth.
Front of Card
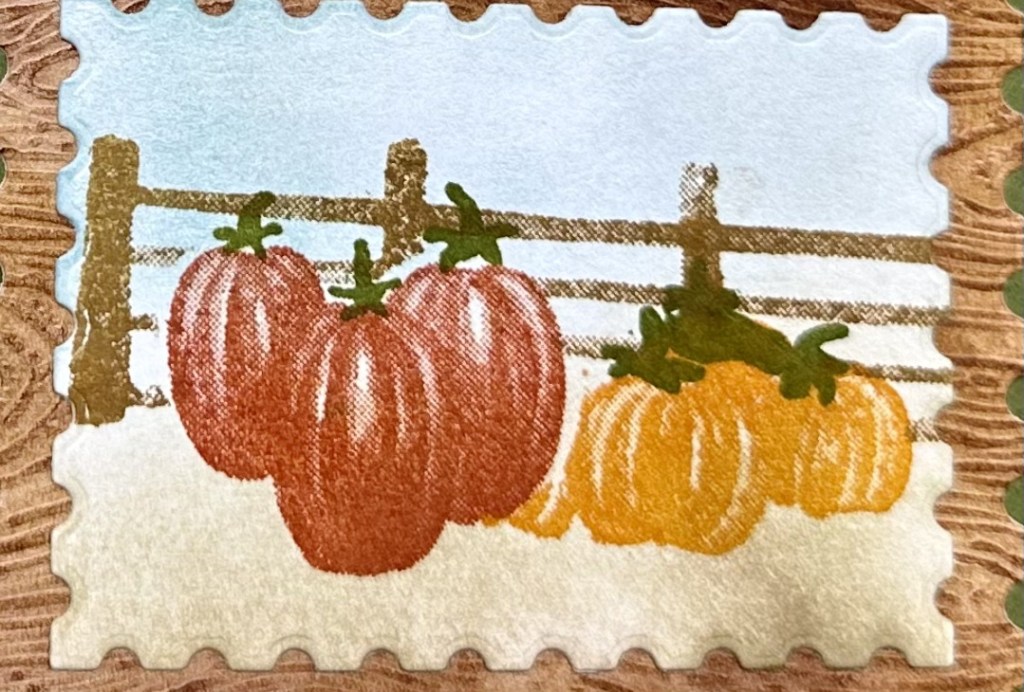
I cut two circles of different sizes with dies – one in the same colour cardstock as the card base and one in white. I used blending brushes to create a ground and a sky. Then I used the Scene Pumpkin Patch stamp set to stamp images to create the pumpkin field. To use a mask, stamp your image on the masking paper, then fussy cut (or die cut if you have a matching die) the image out. Create your scene from the front backwards. Stamp your first image – this will be the one that will sit at the front of the scene – then cover it with its matching mask. Then stamp your next image (the image that will be behind the first one stamped). Remove the mask. You now have depth of field in your images! If you do more layers, keep the mask on the first image, add another mask to the second image, and so on. Remove the masks once all images are stamped. I highly recommend watching the video to understand this technique! Once all the images were stamped, I affixed the circle to the larger circle. Then I put Stampin’ Seal on just HALF of the base circle (the left half) and affixed the circle to the left front flap. That way the card closes with the circle on the front but it doesn’t prevent the card opening.
Inside of the Card
For the inside, I die cut 3 small circles from the same cardstock as the cardbase, then die cut 3 smaller circles from white cardstock. I used the same blending technique to create ground and sky on each of the white circles. I then used stamps from the Scenic Pumpkin stamp set to create little scenes on each one. The white circles were then affixed to the Early Espresso circles and they were affixed to the card along the panel to the right of the writing area. This created a look similar to old fashioned plates hung on a wall which added to the rustic, country look.
Belly Band
The belly band can be left blank, or you can decorate it too! In the video, I cut a piece of very vanilla cardstock and then stamped the sentiments in Early Espresso Ink onto Pumpkin Pie Cardstock. then I affixed all of it to the belly band. You can go as simple or as complex as you want with this!
And that’s it! You’re finished! Hooray! I’d love to see your creations so why not join the Drunk Dog Creative Maker’s Gallery on Facebook and share your creations?
Supply List
Some of the items used in the video tutorial have been discontinued. The supplies below are suggestions based on current availability (as of 5 September 2024) that best match the shapes and look of the card made in the tutorial.


Price: $21.75


Marcus, Polly and Hugo, the dogs of Drunk Dog Creative, want to remind you to subscribe to this blog, share with your friends, and follow Drunk Dog Creative on all the socials.
Woof woof. Sit. Stay. Follow us. Good human.
Need supplies?
You can shop for Stampin’ Up! products at https://bridgeta.stampinup.net. You can also click on any of the items in the supply lists in tutorial posts. A percentage of any profit from my SU sales is donated to Dachshund Rescue Australia, so you get great products at a good price and help gorgeous dogs like Hugo find their furever home!
Join my team!
If you spend over $169 why not consider joining my team as an Independent Demonstrator? You will get $265 worth of your choice of products for only $169 and be entitled to a minimum 20% discount on your future orders. Many people join just to be Hobby Demonstrators for the personal discount!


Leave a comment