

Perfect for creating an Advent Calendar Box!
These twisted Christmas Crackers are all the rage in the papercraft world right now! I decided to make an Advent Calendar (Christmas Countdown Calendar) for my grandchildren with them. However, all the instructions I could find made crackers larger than I needed and seemed to waste a lot of paper – they were sizes which had to be cut from 30x30cm (12×12″) paper but with a lot leftover. So I decided to figure out how to make them from 15 x 15cm (6×6″) paper. This still gave me the perfect size to include three pieces of Aussie chocolate (one for each grandkid) and still fit inside a single shoebox (for mailing to the USA) and use my patterned paper more economically!

Whether you want to make an Advent Calendar Box, or just make a few of these crackers for gift giving, you can’t go past this design. For the Advent Calendar Box, I kept it simple. The kids are 5, 3 and 1 years old so they don’t care about the decoration – they want to get it open and get the chocolate! I used some stickles and wrote numbers on small round circle stickers for each box. And honestly, the Reindeer Days Designer Series Paper (DSP) from Stampin’ Up! did all the heavy lifting for me as far as decoration goes! It’s absolutely adorable paper with one side of each design featuring reindeers and the other side featuring Christmasy motifs. You can get the paper HERE or browse other Stampin’ Up! products at bridgeta.stampinup.net.
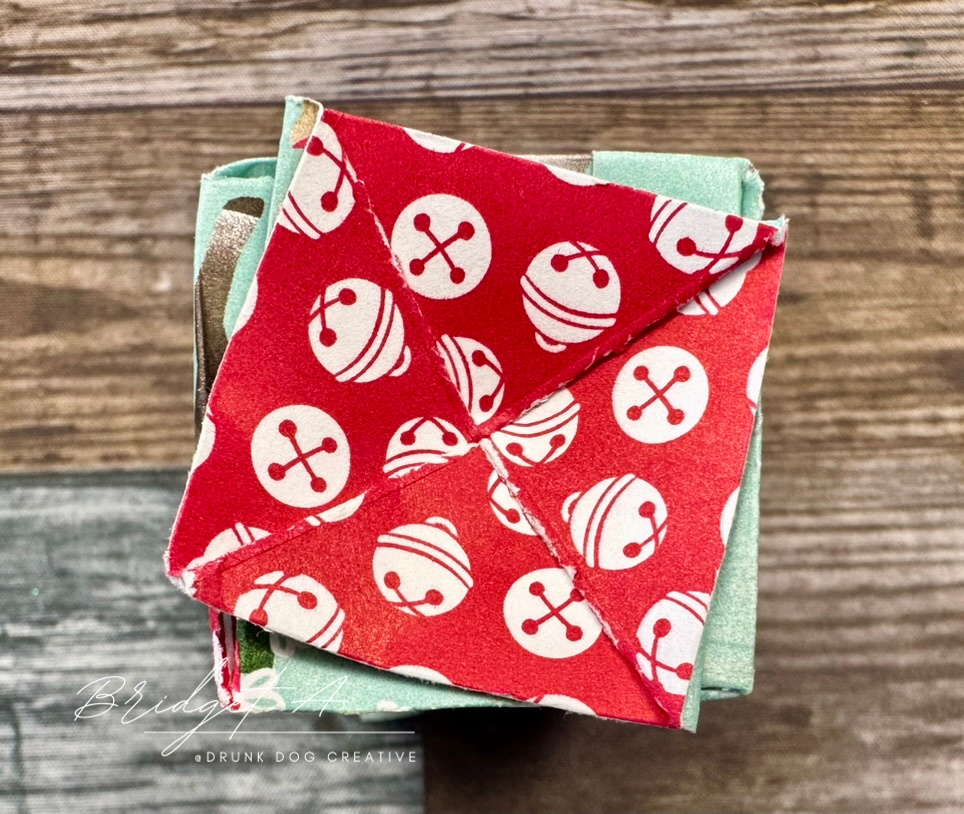
You can also use other papers and embellishments to make these into christmas crackers for older kids or adults. You could even use other papers to make them into little gift boxes for other occassions! The example below uses a foiled Christmas paper with embellishments created using the Hang an Ornament stamp and die bundle. I also tipped the edges of the ends in VersaMark and gold embossing powder then used my heat tool to set them. It gives the edges a little extra sparkle!


Check out the video and written instructions below to learn how to make these. They’re so easy! The video gives instructions in metrics with the imperial (USA) measures in subtitles.
Video
Instructions
Instructions for Imperial measures are given in parenthesis after the metric measure.
Supplies Needed:
- Double Sided Patterned Paper – one piece 15x15cm (6×6″)
- Scissors
- Bone Folder
- Score Board or scoring tools/ruler
- Stampin’ seal (or adhesive tape or glue)
Directions:
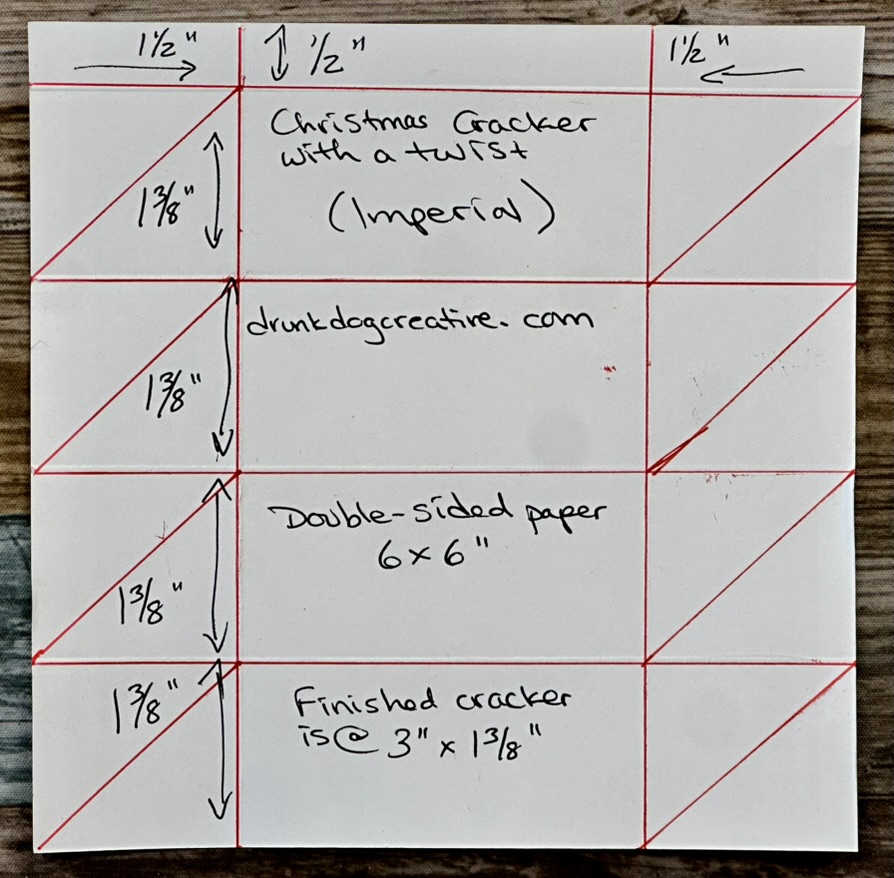
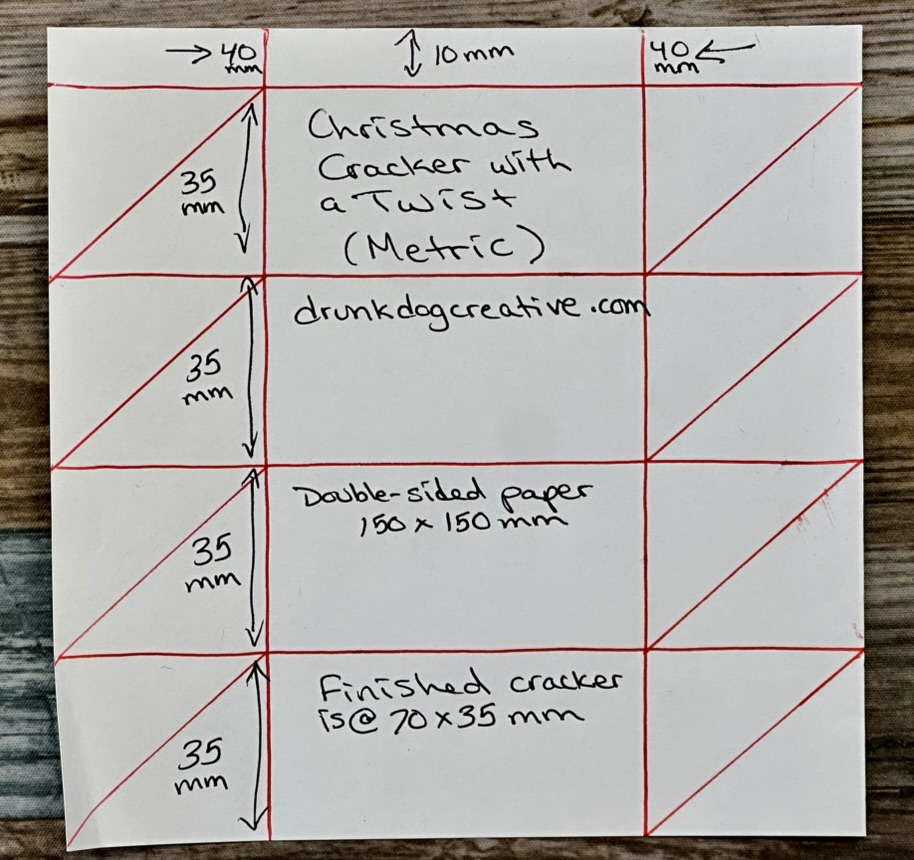
- Cut paper to 15 x 15 cm (6″ x 6″)
- Place paper right side up in the scoring board corner.
- Score vertical lines at 4cm and 11cm (1.5″ and 4.5″)
- Score horizontal lines from bottom to top at 3.5cm, 7cm, 10.5cm, and 14cm (1-3/8″, 2-6/8″, 4-1/8″ and 5-1/2″)
- Score diagonal lines in each of the squares on the left side from the top right to the bottom left of each box. Repeat the same in the boxes on the right side.
- Snip the corners off the 1cm (1/2″) flap at the top.
- Using your bone folder, fold all vertical and horizontal lines.
- Turn paper over and using your hands, fold along all diagonal creases.
- Put stampin’ seal along the wrong side of the 1cm (1/2″) flap.
- Fold paper along the middle horizontal fold line (this should make the edge line up just under the flap’s score line).
- Fold the flap over and press closed.
- Place cracker on one end in it’s box shape. Place your hand on top of the open end and gently push down while twisting to the right. This should cause the diagonal score lines to fold, closing that end of the box. Push in the middle of the spiral to ‘lock’ in place. Note the more accurate your diagonal score lines are the better the mechanism will close and lock.
- Fill the cracker with treats, presents, etc.
- Repeat step 12 for the other end.
Optional: Embellish box as you wish using sentiments, embossing powder, die cuts, etc. Or just let the paper speak for itself!
To make in bulk: If you are making a lot of these (like for an Advent Calendar Box), it is best to do one thing at a time on all pieces of paper – sort of like a factory line. There are tips for this in the video above!
Advent Calendar Box
To make an Advent or Christmas Countdown Calendar Box, place numbers on each of the 25 Twisted Christmas Crackers. I used stickles to write numbers on small found stickers. Then stack in a shoebox or other suitable container. Mine are in a double layer in a shoebox type box.
Supplies
Browse bridgeta.stampinup.net for supplies or click the link below to add the project items to your shopping cart automatically!
Happy Making!

Marcus, Polly and Hugo, the dogs of Drunk Dog Creative, want to remind you to subscribe to this blog, share with your friends, and follow Drunk Dog Creative on all the socials.
Woof woof. Sit. Stay. Follow us. Good human.
Need supplies?
You can shop for Stampin’ Up! products at https://bridgeta.stampinup.net. You can also click on any of the items in the supply lists in tutorial posts. A percentage of any profit from my SU sales is donated to Dachshund Rescue Australia, so you get great products at a good price and help gorgeous dogs like Hugo find their furever home!
Join my team!
If you spend over $169 why not consider joining my team as an Independent Demonstrator? You will get $265 worth of your choice of products for only $169 and be entitled to a minimum 20% discount on your future orders. Many people join just to be Hobby Demonstrators for the personal discount!


Leave a comment