
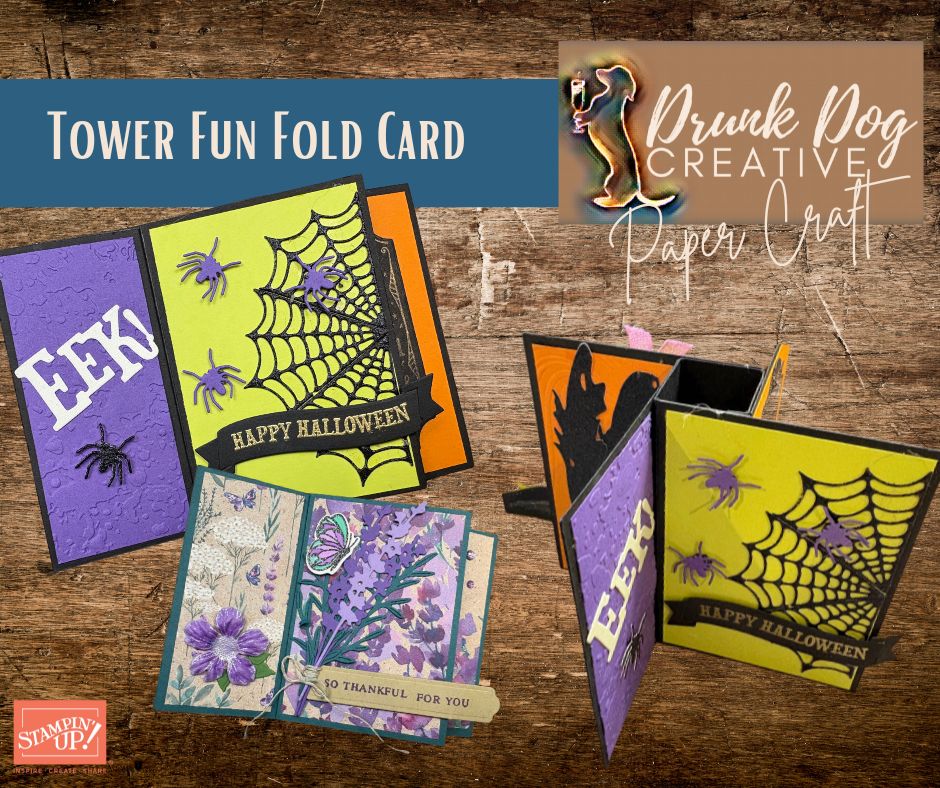
Perfect for the Fright Night Stamp & Die Bundle from Stampin’ Up!
This might be my favourite fun fold card!!!! It is surprisingly simple to make and the basic structure allows you to unleash your creativity in how you decorate it. I originally made this for Halloween using the brand new Fright Night Stamp & Die Bundle from Stampin’ Up! but I discovered how versatile it is and made completely different styles of cards with it too.
The best part? It fits inside a normal envelope! There are a few tricks to that so while the full instructions are written below, it’s a really good idea to watch the video to better understand what can overlap where and why.
The original Fright Night tower card I designed used Basic Black plus three other colours… Pumpkin Pie, Gorgeous Grape, and Lemon Lime Twist. If you’re using coloured cardstock panels then where you place them around the tower becomes important if you don’t want to double up colours next to each other on each side. The instructions below (and in the video) show you how to place panels if you use three colours (plus the base colour).
I did play with adding a fourth colour – Darling Duckling – as four colours makes the placement of the mat panels more logical and really appeals to the part of me that acts out of my left brain. I’ve included placement instructions below for this too (and in the video).
That said, I also made a non-Halloween card with Designer Series Paper (DSP) and all logic went out the window… which appeals to the right-brain part of me. 😁 Placing the panels there was a case of playing with combinations until I was happy with what went where. So, the moral of the story is, there are no rules with this design… you can decorate the panels any way you want with anything you have.
I am a big believer in using what you already have in your stash. I had a lot of products from before I found Stampin’ Up! so I do still use them in card making and other papercraft projects. I have a stash of die cuts, flowers I’ve made, and other embellishments and found this card design is perfect for using those up! You really are only limited by your imagination!!!
So let’s get to the ‘how to’ to make this card. I highly recommend watching video which includes an introduction showing off these cards, and some tips. The cut plan and how to assemble the card is in the video as are the tips for what panels on the card can have something hanging over the edge and still fit in an envelope. There’s also bonus content at the end of the video for how to make the little pouch to slip in a note, gift card, or even money.
How to Make the Tower Fun Fold Card
Video Tutorial
This card is fairly simple to make but it’s much easier to show you rather than to describe it in words. I highly recommend watching the video tutorial. 😁
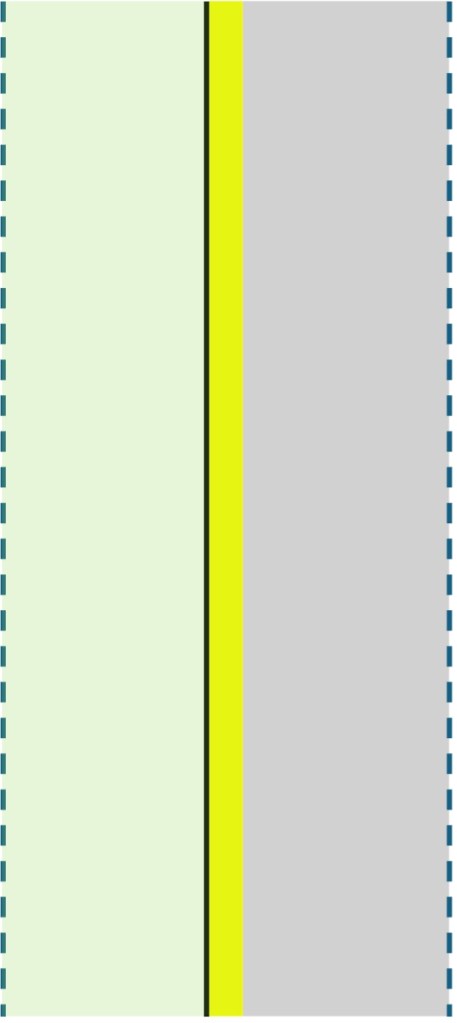
Cut Plan
| Metric (AUS, UK, EU, etc) | Imperial (USA) | |
| Tower | 105 x 105 mm score at 25, 50, 75 & 100 mm | 4.25 x 4.25″ score at 1″, 2″, 4″ & 4″ |
| Base Panels | 74 x 105 mm | 2.75 x 4.25″ |
| Large Mat Panels | 69 x 100 mm | 2.5 x 4″ |
| Small Mat Panels | 44 x 100 mm | 1.5 x 4″ |
3-colour plan:
If using three colours of cardstock for the mats, cut the following:
| Gorgeous Grape | Pumpkin Pie | Lemon Lime Twist | |
| Large Mat Panels | cut 1 | cut 1 | cut 2 |
| Small Mat Panels | cut 2 | cut 2 | none |
4-colour plan:
If using four colours of cardstock for the mats, cut the following:
| Gorgeous Grape | Pumpkin Pie | Lemon Lime Twist | Darling Duckling | |
| Large Mat Panels | cut 1 | cut 1 | cut 1 | cut 1 |
| Small Mat Panels | cut 1 | cut 1 | cut 1 | cut 1 |
If using DSP, it is a good idea to play around with your combinations to ensure you have them in the order you want them before you cut them.
Instructions
- Fold the Tower piece along each score line. Using a bone folder is helpful here.
- Place adhesive on the thin edge (the 5mm or .25″ edge).
- Turn tower over and fold on second score line so that the adhesive edge is in the middle of the tower piece and the adhesive is facing up. Fold the other edge over on the first score line on that side so that it overlaps the adhesive edge. Press together. You should now have a four sided rectangular cube… the tower. (This will likely make more sense in the video).

- Put tower flat on worksurface (2 sides facing up and 2 sides facing down). Place adhesive on the right side column. Align one of the Base Panels to the right column and the top and bottom edge of the tower and just microscopically to the right of the fold between the columns. You want it nudged up to it but not overlapping it so that the corner can still be made by the fold. .
- Turn tower over, repeat step 4 with another of the Base Panels.
- Put adhesive on the column on the left. Affix one of the base panels to it, aligned top and bottom and aligned to the left edge of the tower, again without overlapping the actual fold line.
- Flip tower over and repeat step 6.
You now have all four base panels attached to the Tower like a pinwheel.
- Now affix the Large Mat Panels (if using them) to each of the four Base Panels.
- Affix the Small Mat Panels to each of the spaces at the back of the Base Panels (on the left side).
If you are going to emboss any of the mat panels with an embossing folder, then please do that before attaching it to the base panels. I know that sounds logical, but since I myself made the mistake of forgetting to d that, I figured I might save someone else the embarrassment of having that happen to them! LOL.
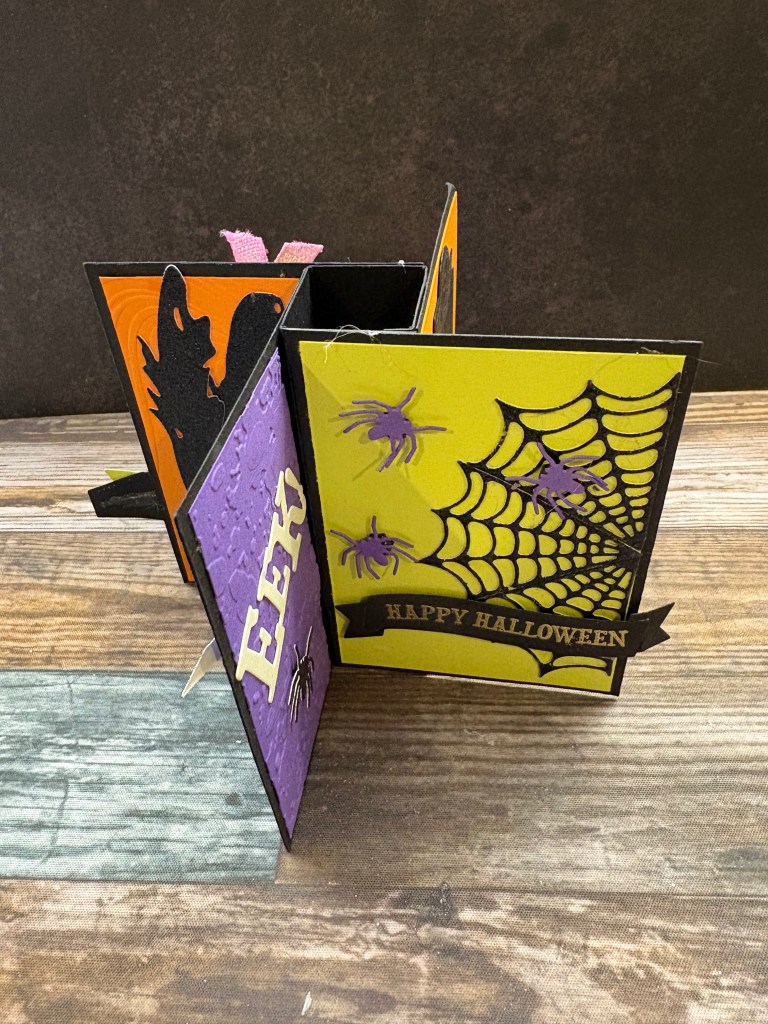
This is the basic structure of the Tower Fun Fold. From here you can decorate it any way you want. You can use coloured cardstock to make mat panels that can be left plain or embossed in an embossing folder. You can use designer series paper (DSP). You can layer white or neutral cardstock over coloured cardstock for stamping images on. You can use embellishments, gems, ribbon, sentiments… literally anything. Be as creative as you want to be when creating the rest of the card!
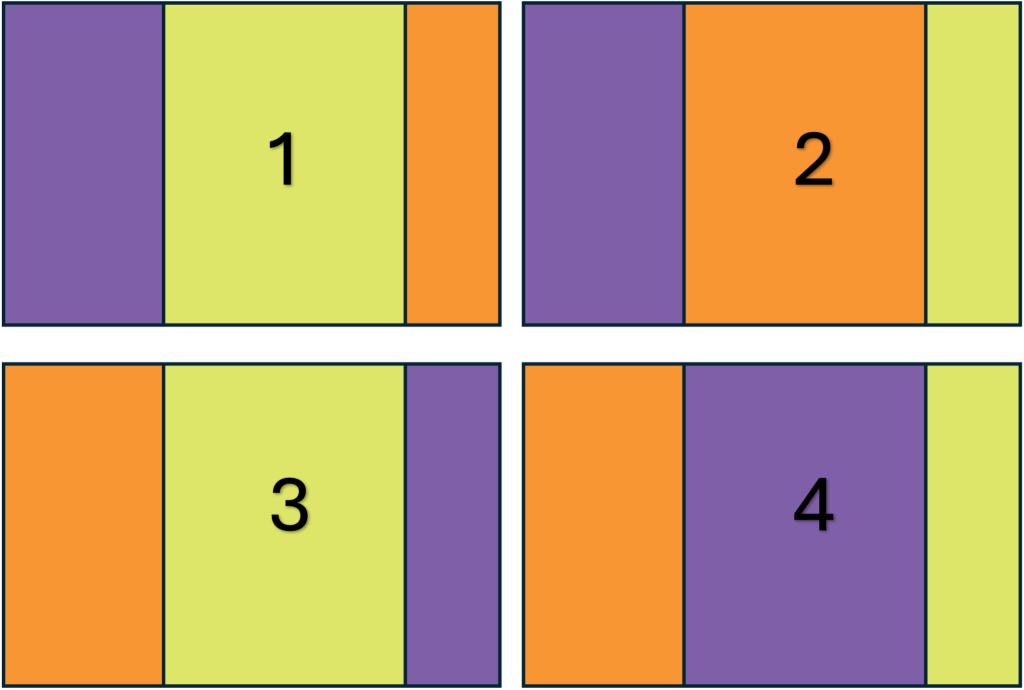
If you want to follow the 3 or 4 colour cardstock plan, the below information tells you where to place those colours so that each side has 3 different colours showing without doubling up.
3-Colour Cardstock Mat Panel Placement
- Lay the tower flat in front of you. Affix one of the Lemon Lime Twist Large Mats to the black Base Panel in the middle.
- Flip the card over. Place another of the Lemon Lime Twist Large Mats to the black Base Panel in front of you. The two lemon lime panels are now on opposite arms of the tower – one facing you and one facing away from you.
- Affix the Pumpkin Pie to one of the Base Panels between the two Lemon Lime Twist panels, and Georgeous Grape cardstock on the other arm between the Lemon Lime Twist.
As you turn the tower, each of the coloured cardstock panels should face you. with the tower standing up but still, opposite arms should have a coloured panel facing you and one facing away from you.
- Affix one of the pumpkin pie small Mat Panel to the black space behind the large pumpkin pie panel (to the left of the lemon lime twist panel).
- Affix the second pumpkin pie small Mat Panel to the black space behind the lemon lime twist panel (to the left of the gorgeous grape panel).
- Affix the Gorgeous Grape small mat panel to the back of the Gorgeous Grape large mat panel (and to the left of the Lemon Lime Twist panel).
- Affix the second Gorgeous Grape small mat panel to the back of the next Lemon Lime Twist Panel (to the left of the Pumpkin Pie large mat panel).
4-Colour Cardstock Mat Panel placement
This version is much simpler and more logical…. Affix one of the large mat panels to a black base panel. Affix the same colour small mat panel to the black space behind the larger panel (to the left of the next large base panel in the rotation). Continue all the way around. Much easier. 😁

Decorating the Card
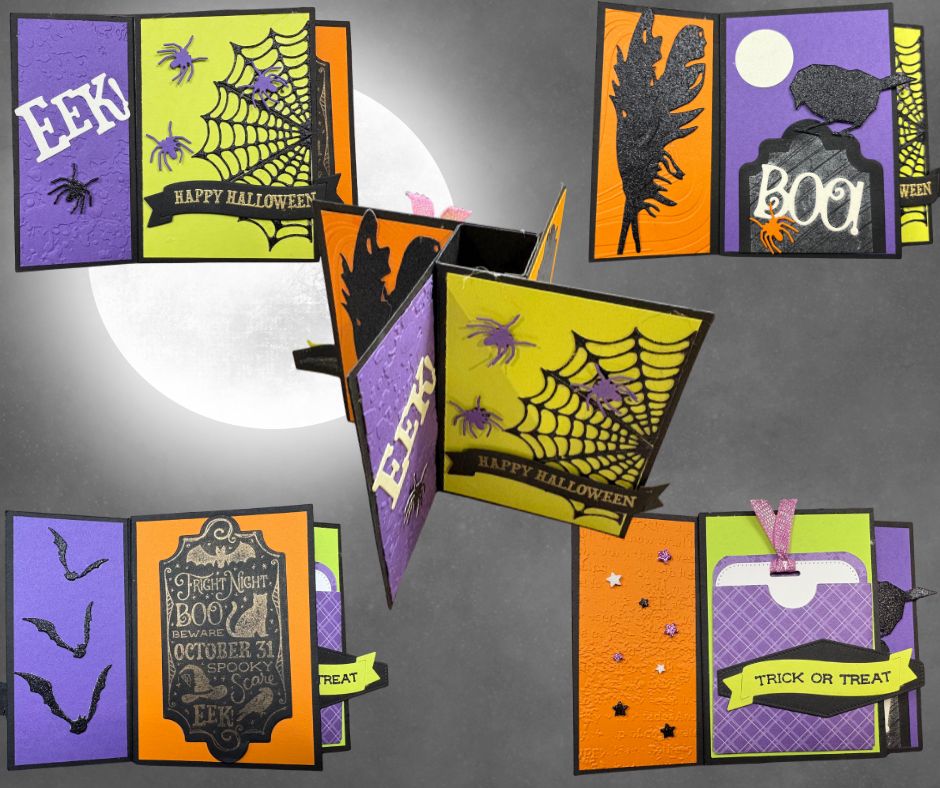
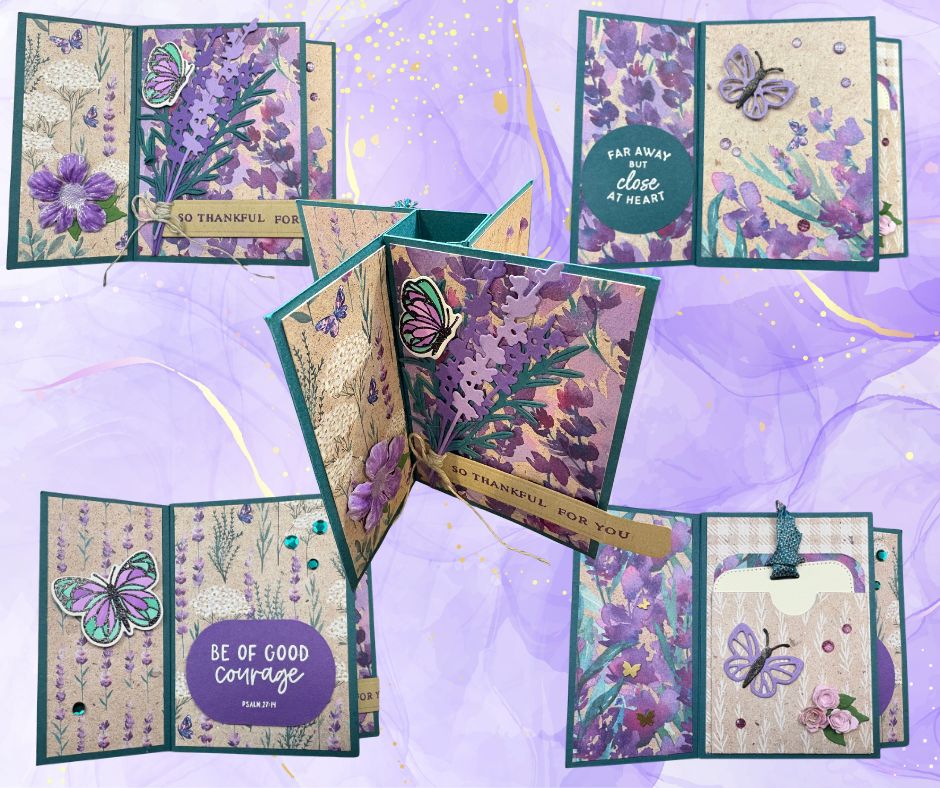
Let your creativity run wild now! Add whatever you want to each panel of the card. You can layer more panels, use stamped images, add sentiments, embellishments, ribbon, etc. You can add a top panel to write a message on on one of the arms or you can create a pouch to hold a card with your message on it (or a gift card or money!). The video has a bonus tutorial at the end on how to make the pouch I used on the same cards pictured. I’ve included those instructions below as well.
An Important Note on Overhanging Embellishments
If you want to add sentiments or other embellishments that overhang an edge of a panel, there are a few things to be aware of….
Make sure the embellishment overhangs the panel its right side only. If it overhangs the smaller panel on the left, it won’t fit in the envelope.
Make sure the embellishment is on the front or pack panels. Not a left or right one. So decide which part of the card you want to be the front and mark it somehow so you remember. If the overhanging embellishment is on the left or right panel, the card will not fit in the envelope.
Gift Card Pouch
One the two cards featured in this tutorial, I made a little pouch for one of the panels. I cut a piece of cardstock and added a pull ribbon to it to write a message to the recipient on it. You can also use it for gift cards or even money.
To make the pouch:
- Cut a piece of DSP to 85 x 150mm (3.5″ x 6″)
- Score at 10mm (0.25″) along each long edge
- Score at 68mm (2.75″) across the DSP.

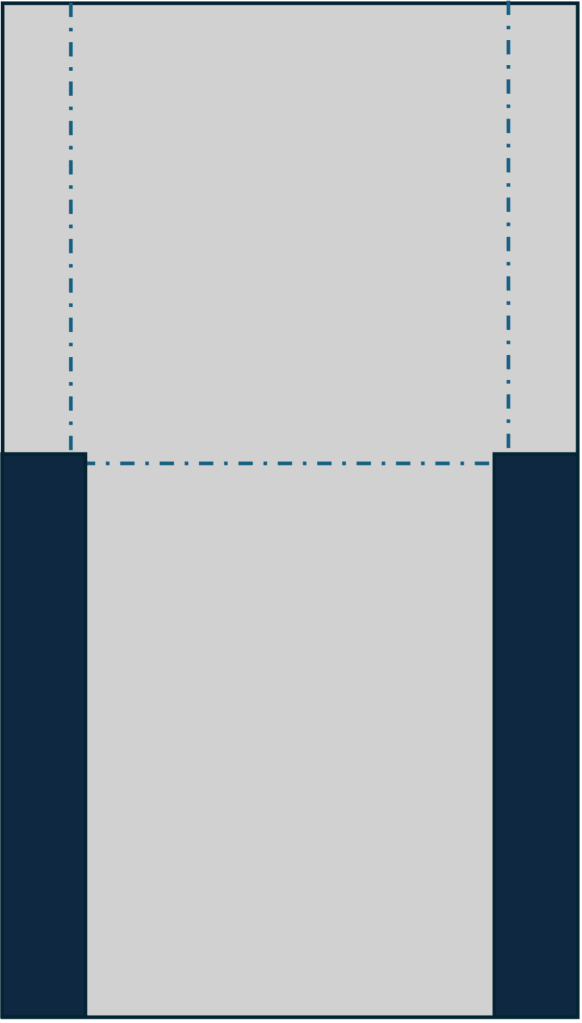
- Cut out the rectangle pieces on the longer side of the DSP (see photo with black-out areas). Cut the pieces out just a tiny bit on the outside of the score lines.
- Fold along the middle score line.
- Put adhesive on the two side flaps, fold them over the back of the pouch and press them down.
- Put adhesive on the back of the pouch and affix to the card.
For my message card, I used the Nested Essentials Die Set from Stampin’ Up! to cut out a piece of Basic White Thick cardstock. I used the ribbon slot punch from the Hole Punch Assortment bundle then put some ribbon through it to use as a pull tag to lift the card out of the pouch. You can just cut a piece of cardstock to fit the pouch rather than use a die. I just think the die gives it a nice finish.
So that’s it! You’ve made your Tower Fun Fold Card! I’d love to see photos of your creations. Please tag #DDC and/or #DDCTower in your posts so I can have a look!


Marcus, Polly and Hugo, the dogs of Drunk Dog Creative, want to remind you to subscribe to this blog, share with your friends, and follow Drunk Dog Creative on all the socials.
Woof woof. Sit. Stay. Follow us. Good human.
Need supplies?
You can shop for Stampin’ Up! products at https://bridgeta.stampinup.net. You can also click on any of the items in the supply lists in tutorial posts. A percentage of any profit from my SU sales is donated to Dachshund Rescue Australia, so you get great products at a good price and help gorgeous dogs like Hugo find their furever home!
Join my team!
If you spend over $169 why not consider joining my team as an Independent Demonstrator? You will get $265 worth of your choice of products for only $169 and be entitled to a minimum 20% discount on your future orders. Many people join just to be Hobby Demonstrators for the personal discount!


Leave a comment