

Think you’ve seen all the fun fold cards out there? Think again!
Today I’m sharing a Slider Card design that creates a fun interactive surprise when the card is opened. As you open the card, the panel slides across, revealing your message. It’s a clever design that looks impressive but is actually quite simple to make once you understand the mechanism.
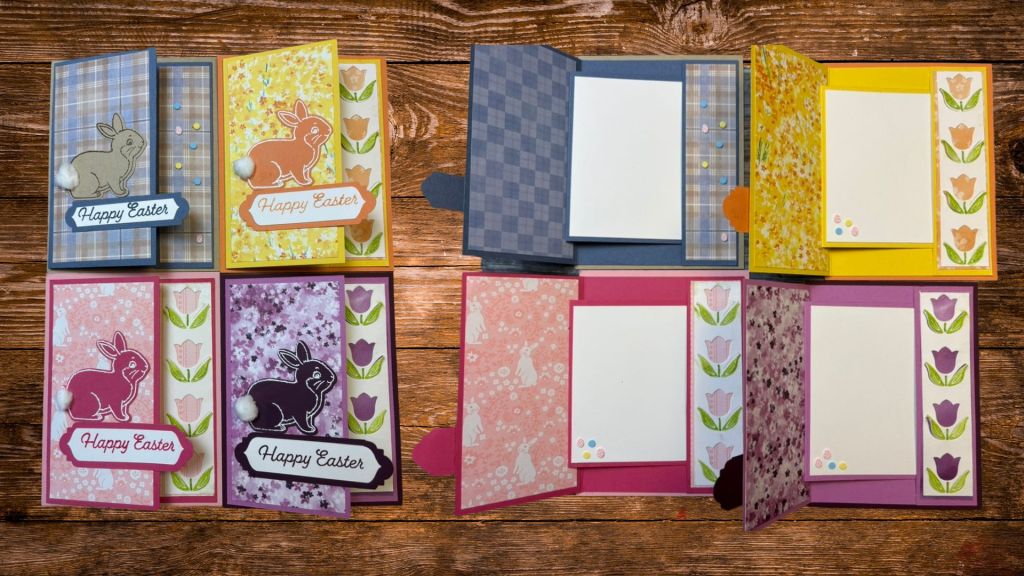
For this version I’ve used an Easter theme, featuring sweet bunny images, spring colours, and soft floral papers. The little pom-pom tail on the bunny adds a playful touch and a bit of dimension.
However, the best thing about this card layout is how versatile it is.
In the images here and in the tutorial, I’ve used products that are no longer available because I saw this design as the perfect stash buster to use up paper and embellishments and to have a go with stamps and dies that were languishing on my shelves. We all have products like this, so this is a perfect opportunity for you go bust your stash too!
By simply changing the colours, stamps, and patterned papers, you can easily adapt this design for almost any occasion, including:
• Birthdays
• Mother’s Day
• Baby cards
• Thank You cards
• Christmas cards
• Sympathy cards
• or just a thoughtful handmade note
Once you learn the slider mechanism, it’s a layout you’ll likely come back to again and again.
Watch the Full Tutorial
In the video tutorial below, I walk you through the complete process step by step. Jump to any section of the tutorial using the time stamps below:
00:00 – Introduction
00:55 – Sample Cards
03:30 – Cut Plan
06:12 – Assembly Instructions
10:16 – Embellishments and Ideas
12:52 – Contact Information
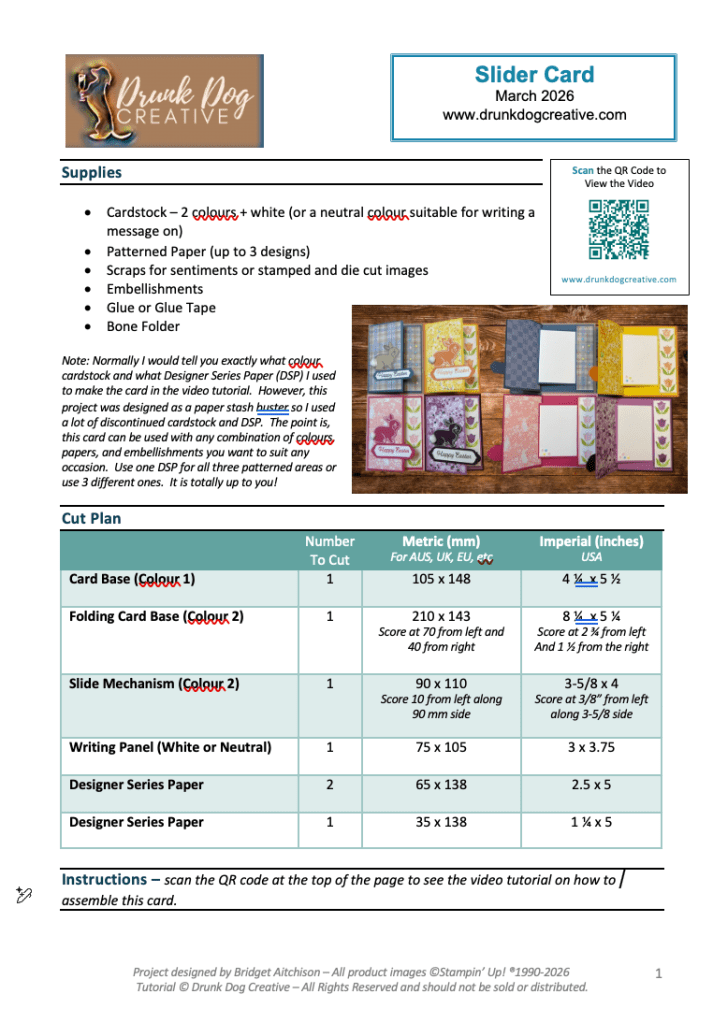
Cut Plan
There are quite a few tutorials available for similar slider cards, but most of them are designed using imperial measurements for US card sizes. Much of the rest of the world, including Australia, works in metric measurements, and our standard card sizes are slightly different.
So, I took inspiration from a tutorial by Karen Titus in the USA and then re-engineered the design to suit metric measurements and an A6 card size, which is the standard here in Australia and in many other metric-based countries.
However, because I’m a Professor in my day job, I firmly believe in giving credit where it’s due. After all, plagiarism is practically a capital offence in academia! 🤣
So if you’re in the United States, you might want to pop over to Karen’s YouTube channel and give her tutorial a little love as well. 🥰
| Number To Cut | Metric (mm) For AUS, UK, EU, etc | Imperial (inches) USA | |
| Card Base (Colour 1) | 1 | 105 x 148 | 4 ¼ x 5 ½ |
| Folding Card Base (Colour 2) | 1 | 210 x 143 Score at 70 from left and 40 from right | 8 ¼ x 5 ¼ Score at 2 ¾ from left And 1 ½ from the right |
| Slide Mechanism (Colour 2) | 1 | 90 x 110 Score 10 from left along 90 mm side | 3-5/8 x 4 Score at 3/8” from left along 3-5/8 side |
| Writing Panel (White or Neutral) | 1 | 75 x 105 | 3 x 3.75 |
| Designer Series Paper | 2 | 65 x 138 | 2.5 x 5 |
| Designer Series Paper | 1 | 35 x 138 | 1 ¼ x 5 |
Free Download
You can download a FREE PDF for this tutorial which also includes a QR code that links directly back to the video tutorial, so if you ever need a refresher on how to assemble the card, you can easily jump straight back to the instructions.
Why I Love This Card Design
Interactive cards are always special to receive because they invite the recipient to engage with the card rather than just open it once and set it aside. The sliding motion adds a little element of surprise, which makes the card feel extra thoughtful.
This design is also great for:
- using up patterned paper
- showcasing stamped images
- creating cards that feel unique without requiring complicated techniques
Crafting Tip
When making slider cards, it helps to test the movement of the slider before adding dimension or embellishments. Making sure everything moves smoothly at the start will save you frustration later.
Let’s Stay Connected
If you live in Australia, I would love to be your Stampin’ Up! demonstrator.
Shopping with me helps support my tutorials and creative projects, and I’m always happy to help fellow crafters with ideas and inspiration.
You can browse my Stampin’ Up! shop here:
bridgeta.stampinup.net
And if you enjoyed this project, be sure to subscribe to my YouTube channel and check out my socials so you don’t miss future card making tutorials!
Supply List
While some of the supplies I used in the video are no longer available, below are my suggestions for essential tools everyone should have, and some products that would be perfect for this style as an Easter Card. Remember, all products featured in a Suite can also be purchased individually.


Marcus, Polly and Hugo, the dogs of Drunk Dog Creative, want to remind you to subscribe to this blog, share with your friends, and follow Drunk Dog Creative on all the socials.
Woof woof. Sit. Stay. Follow us. Good human.
Need supplies?
You can shop for Stampin’ Up! products at https://bridgeta.stampinup.net. You can also click on any of the items in the supply lists in tutorial posts. A percentage of any profit from my SU sales is donated to Dachshund Rescue Australia, so you get great products at a good price and help gorgeous dogs like Hugo find their furever home!
Join my team!
If you spend over $169 why not consider joining my team as an Independent Demonstrator? You will get $265 worth of your choice of products for only $169 and be entitled to a minimum 20% discount on your future orders. Many people join just to be Hobby Demonstrators for the personal discount!


Leave a comment