
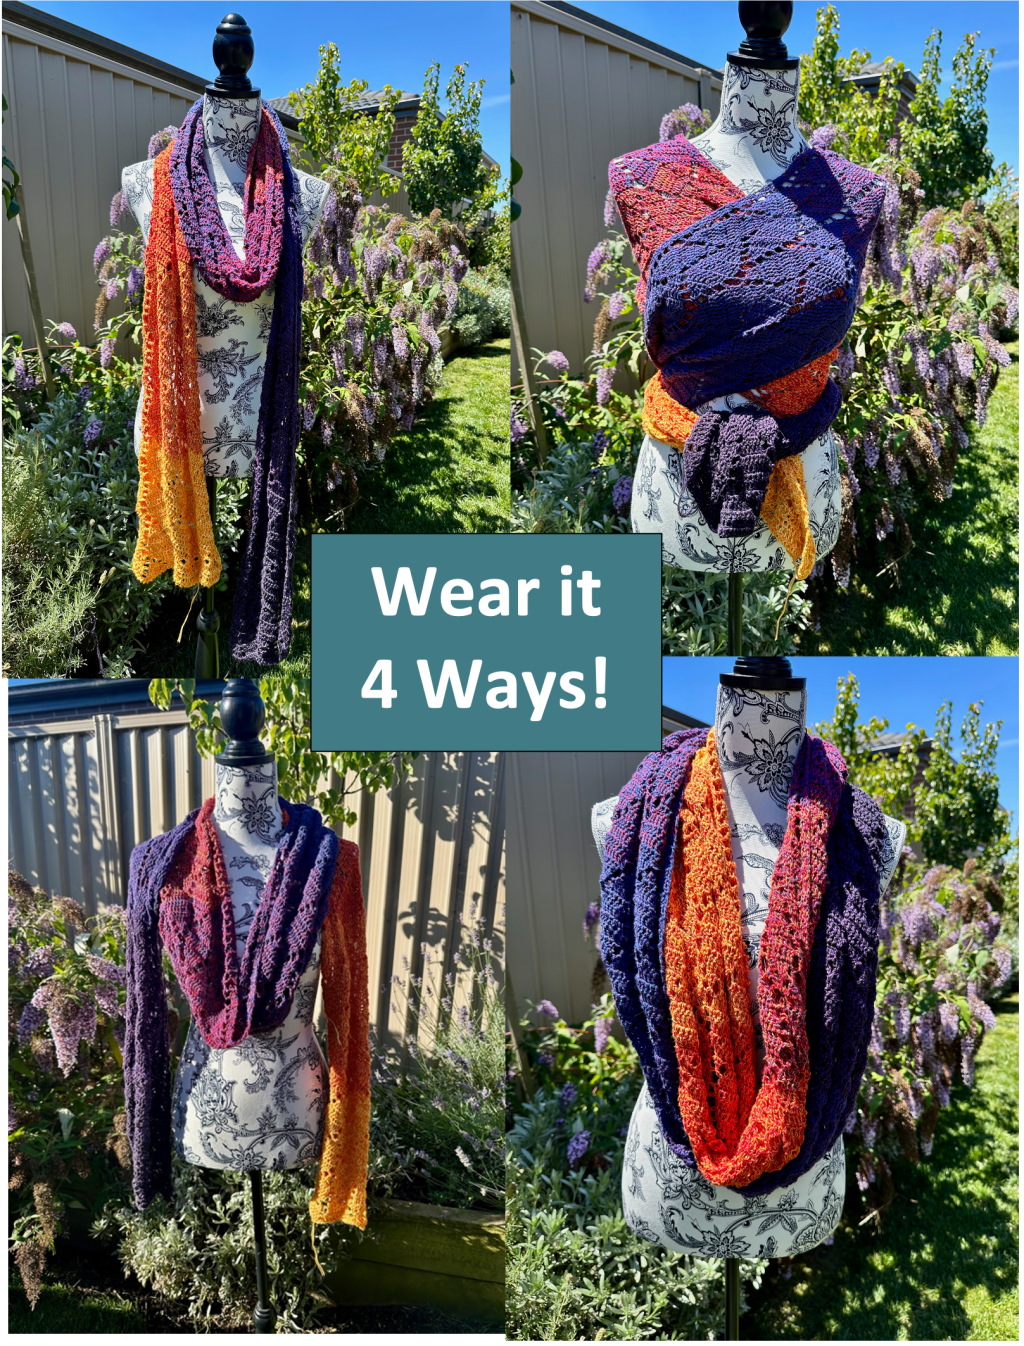

This scarf is made in a branching leaves pattern using fingering weight colour change yarn and a 3.5mm hook. Featured here is Garnmanufaktur Lola (300g/1125m) in the gorgeous Strelizia colourway. Lola is a hand-tied, 4-strand cotton/acrylic yarn from Germany which contains 6-8 colours giving you up to 16 colour changes depending on the Lola being used. Another great option for this pattern is the Scheepjes Whirl. This is similar to Lola but has slightly less yarn and is plied rather than stranded which is often easier to work with. My finished scarf measured 30cm (12″) wide by 295cm (116″) long.
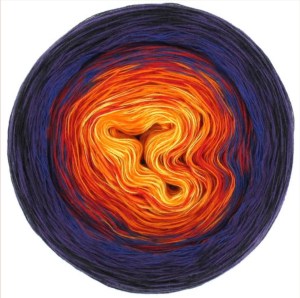
If you are in Australia, you can get Lola and Scheepjes Whirl at Bellemae Yarns. There are hundreds of colourways and Yasmin, the owner, is a genius at helping you figure out what you need. Please note, this is NOT an affiliate link. I do not get any compensation for this recommendation. It comes from my heart and from my experience. ☺️
The pattern below includes three different finishing techniques which enable you to wear this scarf at least four different ways:
- Scarf Finish: Leave it as an extra long scarf without any seams to wear as a scarf or to wrap in a criss-cross to turn it into a shawl.
- Infinity Scarf Finish: Connect the ends to create a long infinity scarf
- Sleeve Scarf Finish: Sew sleeve seams to create a sleeve scarf that can also be worn as a normal scarf.
The stitches used are simple but the pattern is classed as intermediate because you have to be careful of your stitch count and placement. The pattern below is written in USA crochet terms. A free pdf version is available in your choice of USA or UK crochet terms on Ravelry. Happy Hooking!

WEAR IT 4 WAYS SCARF PATTERN
Materials
1 Garnmanufaktur Lola (300g/1125m) or Scheepjes Whirl (225g/1000m)
3.5mm hook
Yarn needle
Gauge
Gauge is not as important with this scarf as long as you are using fingering weight yarn with the appropriate size hook. But as a guide: one pattern repeat is 10cm wide by 6cm tall (approximately 4” x 2-3/8”).
Abbreviations
ch – chain
slst – slip stitch
sc – single crochet
dc – double crochet
fdc – foundation double crochet
dc-dec – double crochet decrease across 2 sts
3dc-dec – double crochet decrease across 3 stitches
dc-inc – double crochet increase
3dc-inc – three double crochet stitches in one stitch
st – stitch
sk – skip
ch2sk2next – chain 2 then skip to next stitch (sk over spaces and chains below and do next st in the next actual stitch below.
Notes
The turning chain always counts as a stitch. The last dc of each row is made into the top chain of the turning chain from the row below. There should then be the equivalent of 3 double crochet sts at each edge of the work.
Instructions
R1: fdc 78 (alternatively, ch 80, dc in 4th ch from hook, dc in each ch to end). (78 sts)
R2: ch 3 (counts as a st here and throughout), dc in next 2 sts, *ch2, sk2, dc in next 9 sts, ch2, sk 2, 3dc-inc in next st, ch 2, sk 2, dc-dec, 3 dc, dc-dec, repeat from * twice more, ch 2, sk 2, dc in next 3 sts, turn.
R3: ch 3, dc in next 2 sts, *ch2sk2next, dc-dec, dc, dc-dec, ch2sk2nxt, dc-inc, dc, dc-inc, ch2sk2nxt, dc-dec, dc in next 5 sts, dc-dec, repeat from * twice more, ch2sk2nxt, dc in next 3 sts, turn.
R4: ch 3, dc in next 2 sts, *ch2sk2next, dc-dec, dc in next 3 sts, dc-dec, ch2, 3dc-inc in chsp below, ch2sk2nxt, dc-inc, dc in next 3 sts, dc-inc, ch2, 3dc-dec in chsp, repeat from * twice more, ch2sk2nxt, dc in next 3 sts, turn.
R5: ch 3, dc in next 2 sts, *ch2sk2next (including the 3dc-dec below), dc-inc, dc in next 5 stitches, dc-inc, ch2sk2nxt, dc-inc, dc, dc-inc, ch2sk2nxt, dc-dec, dc, dc-dec, repeat from * twice more, ch2sk2nxt, dc in next 3 sts, turn.
R6: ch 3, dc in next 2 sts, *ch2sk2nxt, 3dc-dec, ch2sk2nxt, dc-inc, dc in next 3 sts, dc-inc, ch2sk2nxt, dc in next 9 sts, ch2sk2nxt, 3dc-dec, repeat from * twice more, ch2sk2nxt, dc in next 3 sts, turn.
R7: ch 3, dc in next 2 sts, *ch2sk2nxt, dc-dec, dc in next 5 sts, dc-dec, ch2sk2nxt, dc-inc, dc in next 5 sts, dc-inc, repeat from * twice more, ch2sk2nxt, dc in next 3 sts, turn.
R8: ch 3, dc in next 2 sts, *ch2sk2nxt, dc in next 9 sts, ch 2, 3dc-inc in chsp below, ch2sk2nxt, dc-dec, dc in next 3 sts, dc-dec, repeat from * twice more, ch2sk2nxt, dc in next 3 sts, turn.
Repeat Rows 3-8 until either:
- Your yarn runs out (leaving a little bit for finish options 2 and 3)
- You reach your desired length. For reference, the scarf pictured in this pattern is 295cm long x 30 cm wide (approximately 116 inches long x 12 inches wide).
Final Row: Ch 3, dc in next 2 sts, follow whatever row your pattern ends on but include 2 dc in each chsp (and if the previous row has a 3dc-dec, do 1 dc in that st).
Finishing Options
There are three options to finish this scarf off, depending on how you want to wear it.
Option 1: Scarf
To leave this as a normal long scarf, simply fasten off and weave in your ends. Finished!
If the scarf is long enough, it can be wrapped around your body by placing the centre behind your neck, bring both ends to the front, criss-cross over your chest, pass to the back and cross-cross at your lower back, bring ends to front and tie at waist.
Option 2: Infinity Scarf
Being careful to not twist the scarf, align the ends together with right sides facing each other (wrong sides out). Ch 1, Slst in each st to end. Fasten off and weave in ends.
This option allows you to wear this as an infinity scarf that is double or triple looped around your neck. You can also wear it in any way you would normally wear a narrow infinity scarf.
Option 3: Sleeve Scarf
Being careful to not twist the scarf, fold in half lengthways, right sides together. Join yarn at one end, ch 1, slst along the edge for approximately 28 cms (11 inches) – or feel free to adjust to suit the desired length of your sleeve by measuring from 13cm (5 inches) from your shoulder to where you want the end of the sleeve to reach). Fasten off and weave in ends. Repeat for the other end. Turn inside out so right side is facing outwards. To wear, put one arm through, loop scarf around your neck, put the other arm through, adjust the loop/loops to suit.
Note: As a sleeve scarf, you can also still wear this as a normal scarf. It will just be double over near the ends.
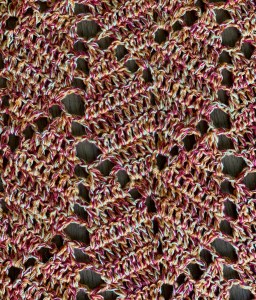
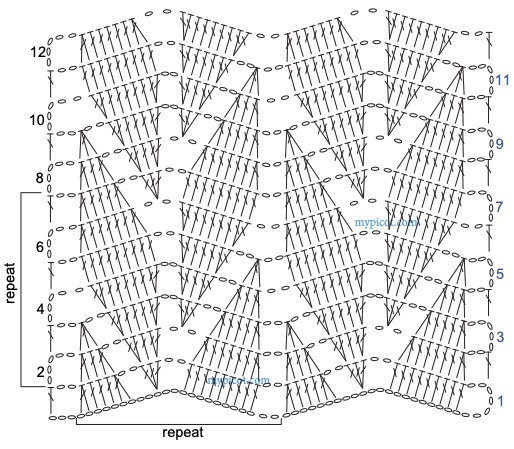
Stitch Chart
The Branching Leaves stitch chart is from mypicot.com. The chart is not of the pattern in this document but is intended to help you visualize how to do the rows. It includes only 2 repeats across of the pattern and does not include the edging sts in the pattern. Please follow the written pattern while using this chart to supplement your understanding of the stitch placement.
Special Thanks
The inspiration for this pattern came from a chart of the branching leaves stitch from mypicot.com. I spent time working out how to make this scarf using the stitch and translating the chart into ‘pattern speak’ to make it more accessible. So, I cannot take credit for the stitch itself but the rest of the work in this pattern is mine. As a result, this pattern will always be free on my website and on Ravelry, with full credit to mypicot for publishing the original stitch chart.
I also owe a very special thank you to the five wonderful ladies who test patterns for me. I am indebted to them for finding the mistakes and helping to fix them. What a joy it was to work with these women!


Marcus, Polly and Hugo, the dogs of Drunk Dog Creative, want to remind you to subscribe to this blog, share with your friends, and follow Drunk Dog Creative on all the socials.
Woof woof. Sit. Stay. Follow us. Good human.
AND ON RAVELRY!


Leave a comment