
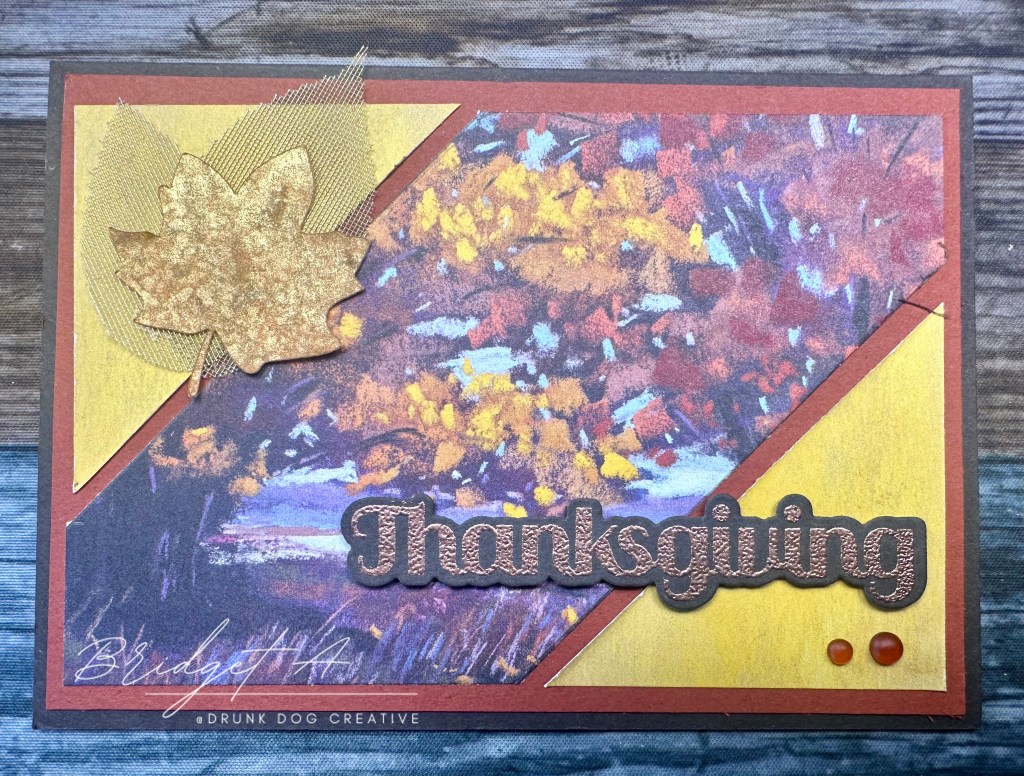
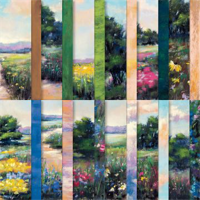
Right now I’m in the thick of the holiday card making season. While I live in Australia, I have family and friends in the USA so I have three holidays in a row to cover – Halloween, Thanksgiving, and Christmas. Halloween is growing in popularity in Australia but isn’t at the ‘card giving’ stage yet, and Thanksgiving is a particularly American holiday that we don’t have here. So it’s really hard to find patterned papers, stamps, dies and embellishments for Thanksgiving. I’m thankful that Stampin’ Up! can come to my rescue. They have released some beautiful autumn themed products in the Sept-Dec 2024 Mini Catalogue and the new Scrapbooking Catalogue. Whew! That said, there’s no stamps that actually say ‘thanksgiving’ so I had to go ‘off brand’ for those. Anyways, when I saw the Splendid Autumn designer series paper, I knew I had to order it! This pack contains 48 sheets of patterned paper: 4 each of 12 double-sided designs 8 each of 6 double-sided designs. That’s 18 designs! One side features a scene that looks like a landscape painting, while the other side is a monotone brushed design.
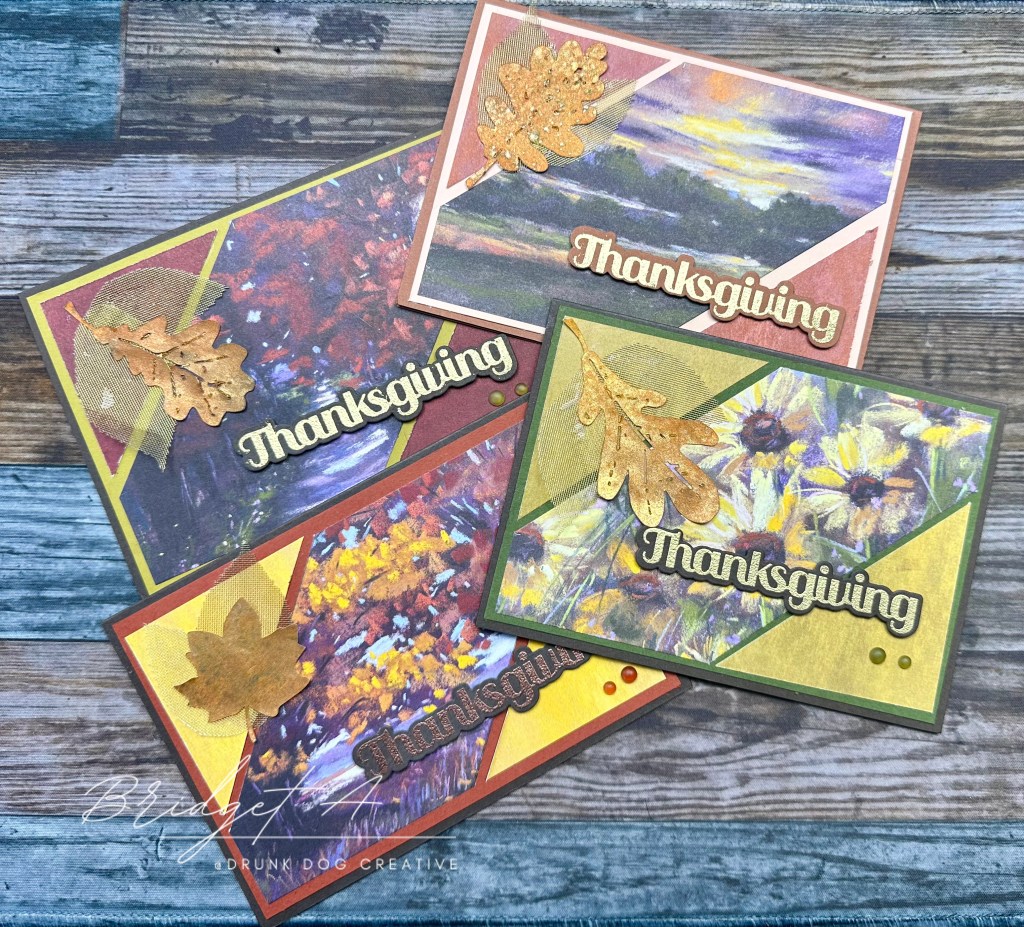
The catalogue also has some beautiful autumn/Thanksgiving themed embellishments like the Faux Glass Adhesive Dots or the Woven Golden Leaves used on the cards above. Of course, like all Stampin’ Up! products, the designer series paper and the glass dots all coordinate with our range of cardstock, inks, and markers, making it so easy to colour coordinate your cards. In fact, the latest Annual Catalogue (you can get a digital copy HERE) has a very helpful Colour Wheel on page 132 as well as information on layouts and colour combinations throughout the catalogue.
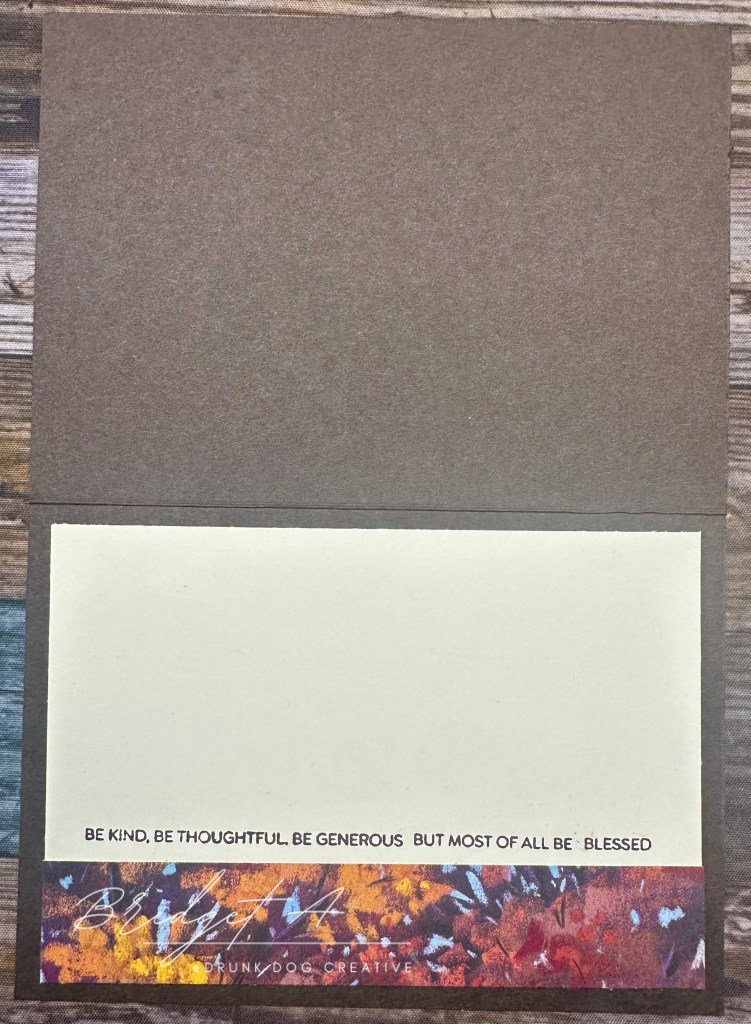
For these cards, I used a single piece of DSP for each card: the main picture, the corner pieces, and the hortizontal piece on the inside of the card which adds a little extra something-something to the writing panel. I used the colour wheel in the catalogue to help pick the cardstock colours for the card base and the mat.
While I’ve used an autumn colour scheme for these cards, this card layout would suit any picturesque patterned paper and colour scheme or any occasion. In fact, there are other pictures in this DSP pack that would go beautifully with non-autumn colours. Stampin’ Up! also have a couple of other landscape type paper sets with different themes and colours that would be beautiful with this card technique – Thoughtful Journey and Meandering Meadows. I will put links to all three DSP packs in the supply list at the end of this post so you can check them out!


6×6″ Designer Series Paper (c) Stampin’ Up! – Splendid Autumn, Meandering Meadow, and Thoughtful Journey.
Video Tutorial
The video demonstrates the cut plan and the assembly process using metric measures but the USA measurements (in imperial) are given on the video as subtitles. The Cut Plan and Instructions are also available below the video.
Instructions
Colours of Cardstock I used for the cards pictured in this post:
Cut Plan
| Cardstock | Metric (mm) | Imperial (inches) |
| Card base | 148 x 210 scored at 105 | 5.5 x 8.5 scored at 4.25 |
| Mat | 143 x 100 | 5.25 x 4 |
| DSP | 138 x 95* 138 x 25 | 5 x 3.75* 5 x 1 |
| Writing Panel | 138 x 95 | 5 x 3.75 |
* Note: the DSP used in this tutorial is 6×6″. In cutting it to size, I took some time to decide what part of the picture I wanted to feature and cut it accordingly. I also kept a strip that I cut off when sizing it then cut as the second piece of DSP to use for the inside (this is the 138 x 25mm piece in the cut plan above).
Assembly
- Cut all cardstock and DSP according to cut plan.
- To cut angles from DSP:
- Measuring from the top left corner, mark 65mm (2″) down along the left edge and the same across the top edge.
- Measuring from the bottom right corner, mark 65mm along the bottom edge and the same up the right edge.
- align the marks in your paper trimmer and cut. Save these pieces!
- Take the triangles you’ve removed from the main picture, and trim 2mm (1/8th”) from the long edge.
- Affix the mat to the cardbase.
- Centre the angled picture on the mat and affix in place.
- Flip the triangle pieces over so the opposite pattern to the main picture is showing and affix the triangles in the corners of the mat, leaving an even space around them (separating them from the main picture).
- Affix the writing panel to the inside of the card.
- Affix the off-cut strip of DSP to the bottom of the writing panel for added interest.
Optional:
- Stamp a sentiment on the writing panel or on die cut or punched cardstock on the front of the car.
- affix any die cuts, embellishments, ribbons, etc to decorate the front.
I embellished the cards shown here with the Woven Gold Leaves and Faux Glass Dots from Stampin’ Up! I also added some other leaves I had made in past years that were leftover. I keep leftover ephemera and embellishments and store them in labelled small plastic storage boxes to use for future cardmaking. I recently did a post about this and how I store supplies for projects. You can see that post HERE. The Thanksgiving sentiment stamps I used are the Thanksgiving/Thankful set from Photoplay because, unfortunately, I can’t get specifically Thanksgiving sentiments from Stampin’ Up! in Australia. For the sentiment on the front of the cards, I stamped the sentiment with VersaMark ink, then heat embossed it with the Stampin’ Up! Metallic Embossing Powder set, then cut it with the matching die in my Mini Stampin’ Cut & Emboss Machine.

Happy Inking!
Supply List
If youv’e seen anything in this tutorial that you’d like to take a closer look at, the links to the Stampin’ Up! products I used in these cards (and the other similar paper packs) are below. Prices and availability are subject to change.
If you live in Australia, I would love to be your Stampin’ Up! demonstrator. You can order anytime at bridgeta.stampinup.net or you can email me at bridgeta@drunkdogcreative.com. Part of all profits from my Stampin’ Up! sales are donated to Dachshund Rescue Australia. You can read about this HERE.


Basic Tools Everyone Should Have!


Marcus, Polly and Hugo, the dogs of Drunk Dog Creative, want to remind you to subscribe to this blog, share with your friends, and follow Drunk Dog Creative on all the socials.
Woof woof. Sit. Stay. Follow us. Good human.
Need supplies?
You can shop for Stampin’ Up! products at https://bridgeta.stampinup.net. You can also click on any of the items in the supply lists in tutorial posts. A percentage of any profit from my SU sales is donated to Dachshund Rescue Australia, so you get great products at a good price and help gorgeous dogs like Hugo find their furever home!
Join my team!
If you spend over $169 why not consider joining my team as an Independent Demonstrator? You will get $265 worth of your choice of products for only $169 and be entitled to a minimum 20% discount on your future orders. Many people join just to be Hobby Demonstrators for the personal discount!


Leave a comment