

I love the Nests of Winter Designer Series Paper from Stampin’ Up! I’ve had so much fun designing cards using the whole Nest of Winter Suite but this card may be one of my favourites because it is so beautiful but also so simple… the paper does all the work! I teamed this suite with the Christmas Labels stamp and die bundle. The colour scheme for this card uses traditional Christmas colours with a pop of Gray Granite.


Instructions
There is a youtube video which demonstrates how to make this card and shows off the elements of the Nests of Winter Suite. There are also written instructions below. The video uses metric measurements but has the USA measurements in subtitles. In Australia we use an A6 card size (based on A4 paper) whereas in the USA an A2 card size (based on Letter size paper) is used. So you can’t just convert the metrics to imperial as the final card sizes will be different. I’ve accounted for that in the video subtitles and in the written instructions as I am a dual citizen (USA/Australia) and work in both measurement systems. 🙂. The only place I’ve used imperial measures for both cut plans is the punched circles as the punches and dies are usually noted in imperial.
Happy Making!
Video Tutorial
Cut Plan
| Cardstock | Metric (mm) | Imperial (inches) | Suggested Colour |
| Card Base | 210 x 148 scored at 105 | 8.5 x 5.5 scored at 4.25 | Cherry Cobbler |
| Mat | 100 x 143 | 4 x 5.25 | Shaded Spruce |
| Card Front (DSP 1) | 95 x 138 | 3.75 x 5 | Nests of Winter DSP – The one that looks like birch wood |
| Inside Mat | 100 x 143 | 4 x 5.25 | Shaded Spruce |
| Writing Panel | 95 x 138 | 3.75 x 5 | Basic White Thick |
| Punched or die cut circles (cut 2) | 2″ round | 2″ round | Cherry Cobbler |
| Punched or die cut birds from DSP | 1.75″ round | 1.75″ round | Nests of Winter DSP – the small birds |
| Scrap for Sentiments | Gray Granite | ||
| Optional Twine | 330 plus extra to make a small bow. | 13″ plus extra to make a small bow. | Garden Green twine (included with Nests of Winter Suite) |
Assembly
- Using a 1-3/4″ circle punch or die, cut out 2 birds from the DSP.
- Using a 2″ circle punch or die, cut out 2 circles from cardstock.
- Affix the bird circles to the cardstock circles – you can centre them or you can offset them like in the photo (see the video for more information).
- Place the circles on the card front so you know where they are doing to be affixed.
- Optional twine:
- take some twine (I used the Garden Green twine from the Nests of Winter Suite) and place it over the middle of the top bird circle. Leaving a finger on the left edge of the twine, remove the bird circle and flip the rest of the twine over your hand (out of the way). Place a little glue tape near your finger and flip the twine back over and affix it in place on the left side. (See video for clarification).
- Turn Card Front over and put a little glue tape at each edge where the twine is. Take the ends of the twine and press into the tape to secure it on the back of the cardfront.
- Turn Cardfront back over and affix second bird to bottom of card.
- Affix card front to mat.
- Affix combined cardfront/mat to cardbase.
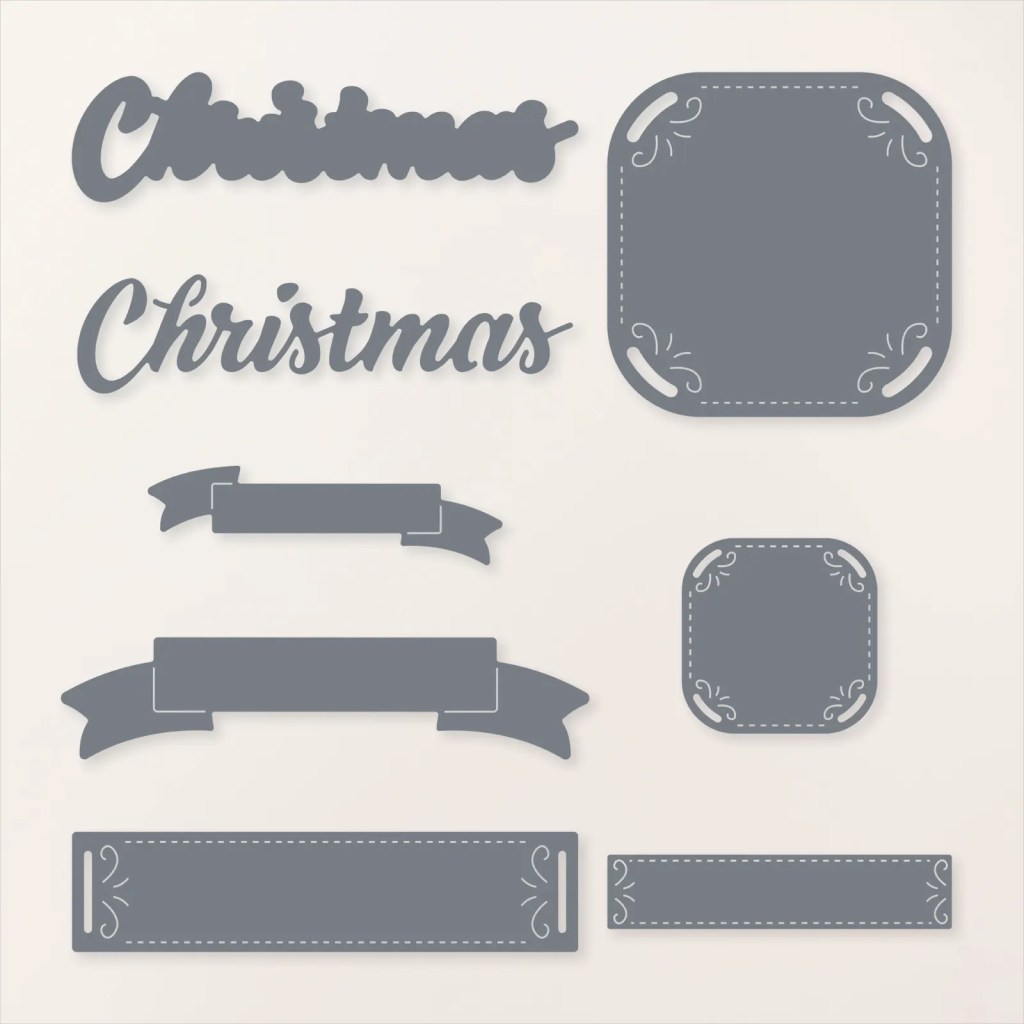
- Using ‘Christmas’ dies from the Peaceful Season bundle, cut the ‘Christmas’ word from Cherry Cobbler cardstock and the background die from Grey Granite cardstock,
- Glue the Christmas word to the background.
- Cut a piece of scrap Grey Granite cardstock so that it is 8mm wide and 68 mm (3/8″ x 2-1/4″) long. Stamp ‘Is In the Air’ sentiment from the Peaceful Season stamp set in Cherry Cobbler on the grey granite cardstock. Snip the ends at an angle on each end with scissors.
- Put two dimensionals (foam dots) on the ‘Christmas’ sentiment and two mini-dimensionals on the “in the Air” strip. Affix to front of the card, on an angle between the two bird pictures.
- Using a mini glue dot, affix the bow to the twine to the right of the top bird circle.
- Optional – Inside Writing Panel embellishment:
- Due cut the red robin bird from the DSP using the corresopnding die in the Winterly Tree Tops bundle (included in the Nests of Winter Suite).
- Stamp a sentiment on the Writing Panel and affix the red robin bird to the writing panel.
- Affix the Writing Panel to the Inside Mat.
- Affix the combination (in step 15) to the inside of the card.
Optional Embellishment: Add a few of the green Earth Tones Shimmer Gems (included in the Nests of Winter Bundle) to the card front.

Supply List
To see the products used in this tutorial, click on the links below or go to bridgeta.stampinup.net to browse products. If you live outside Australia, go to the Stampin’ Up! website for your country to browse products and find an independent demonstrator in your area. A portion of any profit from sales from bridgeta.stampinup.net goes to Dachshund Rescue Australia. You can read more about this HERE.


Basic Tools Everyone Should Have
Below is a list of the basic tools I think every card maker and scrap booker should have. I tried so many products before I was introduced to Stampin’ Up! and I can honestly say, I’ve replaced most of my other brands with SU tools and consumables. The generous discount for being an Independent Demonstrator helps (click ‘join my team’ below for more information on how you can do this too!) but honestly, their products are high quality and good value. If you’re just starting out in your journey, or needing to replace some worn out tools, have a look at the list below!


Marcus, Polly and Hugo, the dogs of Drunk Dog Creative, want to remind you to subscribe to this blog, share with your friends, and follow Drunk Dog Creative on all the socials.
Woof woof. Sit. Stay. Follow us. Good human.
Need supplies?
You can shop for Stampin’ Up! products at https://bridgeta.stampinup.net. You can also click on any of the items in the supply lists in tutorial posts. A percentage of any profit from my SU sales is donated to Dachshund Rescue Australia, so you get great products at a good price and help gorgeous dogs like Hugo find their furever home!
Join my team!
If you spend over $169 why not consider joining my team as an Independent Demonstrator? You will get $265 worth of your choice of products for only $169 and be entitled to a minimum 20% discount on your future orders. Many people join just to be Hobby Demonstrators for the personal discount!


Leave a comment