
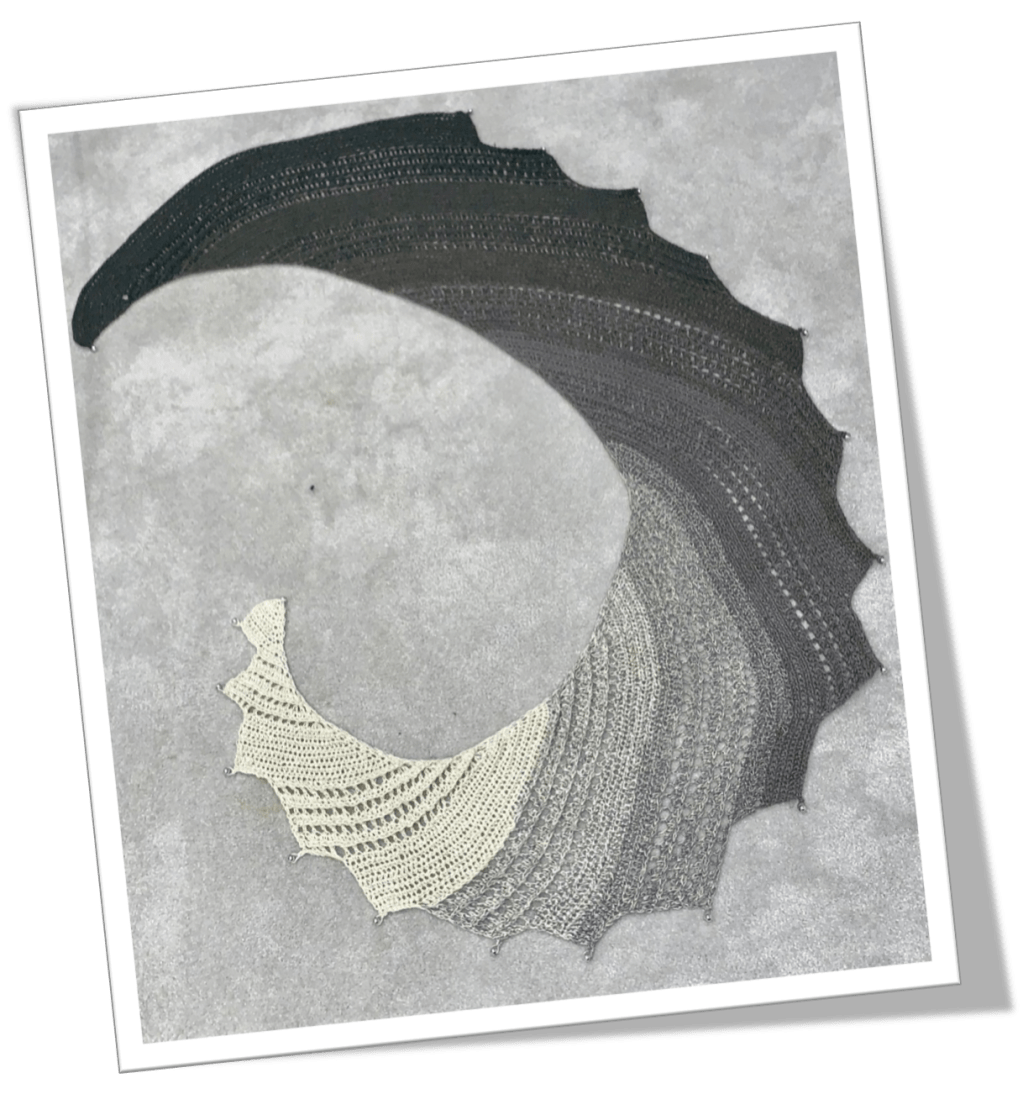

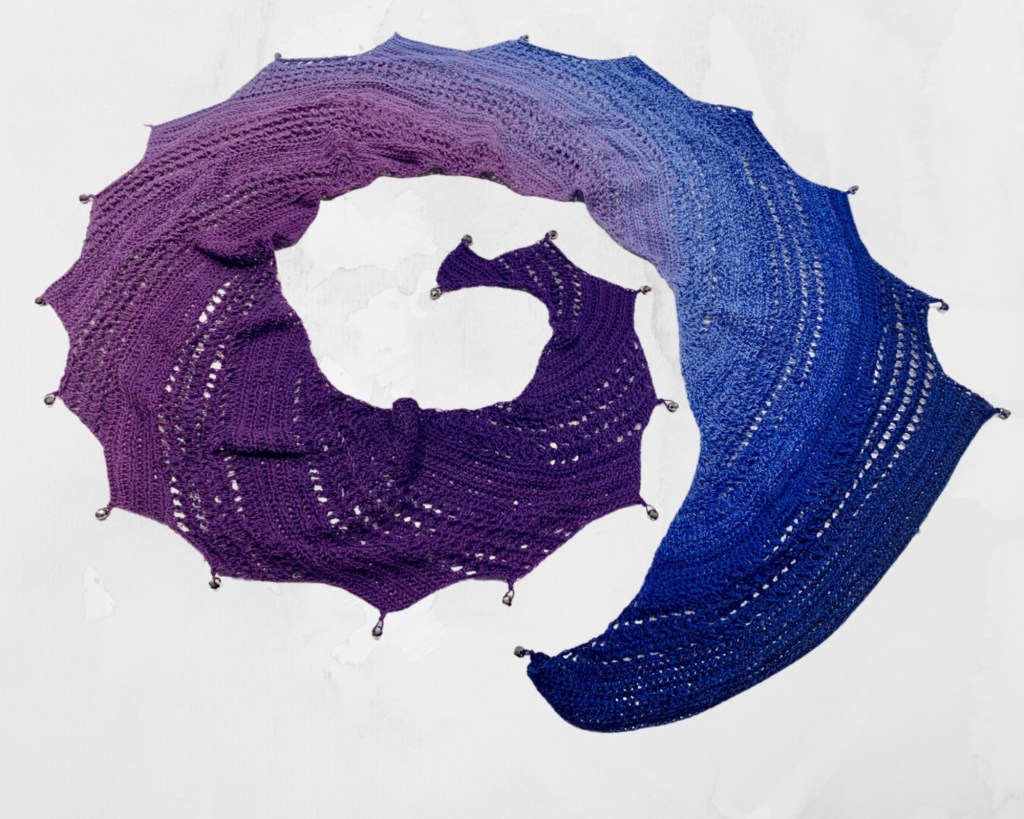
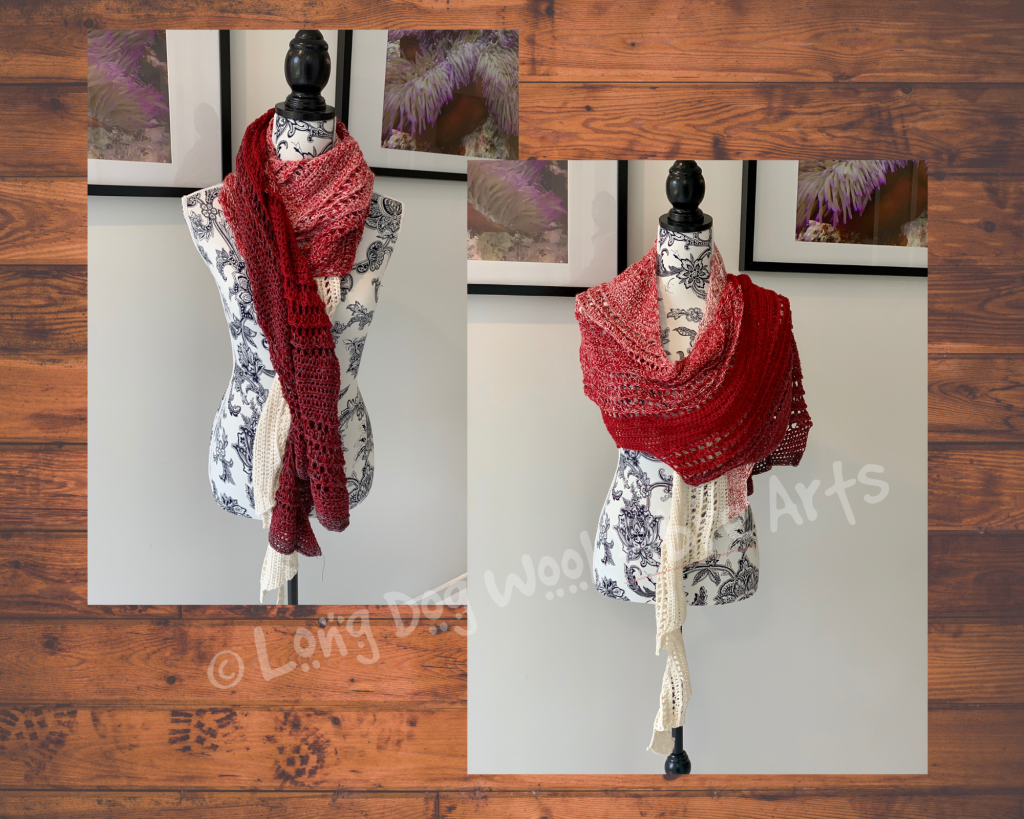
It’s finally here! The updated pattern for the Daughter of Dragons Scarf has hit the Long Dog Wool blog! This has been my most popular design on Ravelry. It’s an intermediate pattern that is also suitable for the adventurous beginner.
The Daughter of Dragons scarf is based on a dragon tail shape. The ‘fins’ alternate between a closed, tight stitch which gives it its heft, and a more open stitch which gives it a lovely drape. This pattern was inspired by a friend of mine’s daughter. She combines the best qualities of the dragon – strong, fierce, super smart – with the best qualities of humanity – compassionate, caring, empathetic. Her mother and I also happen to be fans of Game of Thrones, so there’s that too.
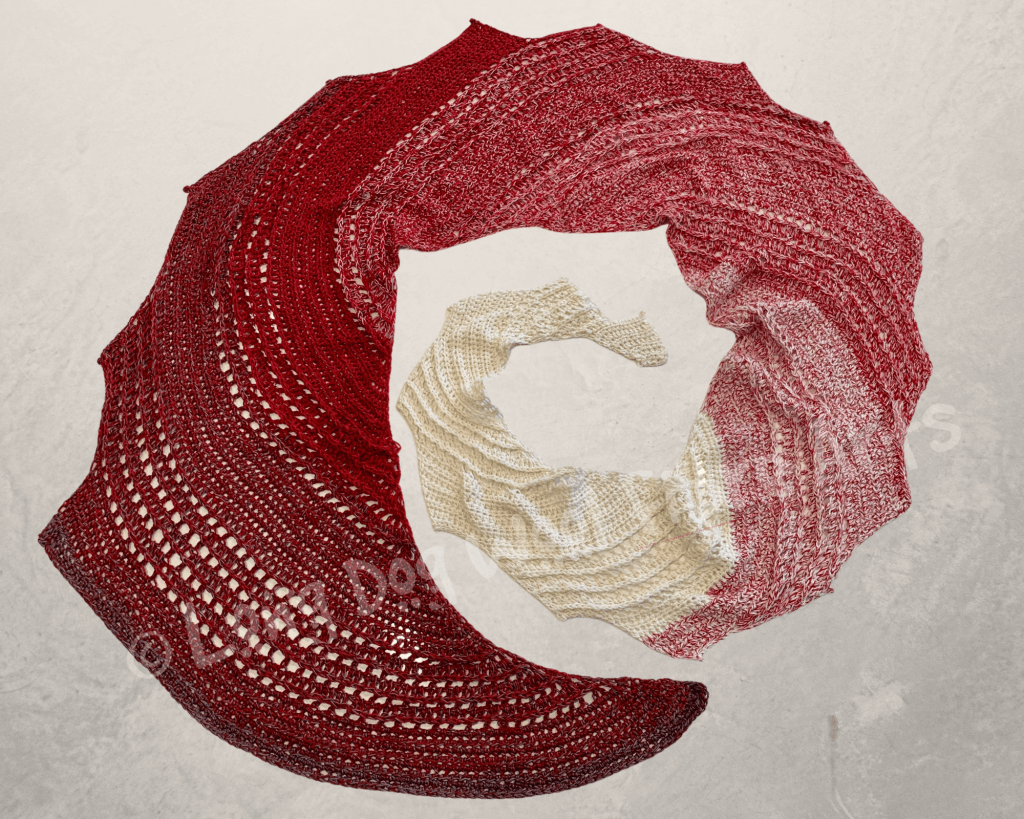
This pattern uses front post stitches and stitch increases at one edge to create the vortex curl. If you aren’t familiar with front post double crochet (front post treble crochet in UK terms), then you can learn how to do those stitches HERE. You will need to be comfortable with them to do this scarf. Instructions are given for beaded and un-beaded versions. Inevitably the questions I get asked have to do with the increases in this pattern, so you will find video tutorials for each section of the pattern below. The pattern here is in US Terms. A printable pdf of this pattern in US Terms or UK terms can be purchased for a minimal fee* on Ravelry HERE. The pdf version also contains some additional information, especially on yarn substitutions.
Materials
- Yarn: Fingering weight, 4-ply or 4-strand, gradient yarn is required. I highly recommend Garnmanufaktur Lola (300g, 1125m, 50% cotton / 50% acrylic).
- Amount: approximately 800-1000 meters needed
- Hook: 3.5mm
- 19 beads (optional) – this amount is for a scarf with 17 fins (sections). If you do a smaller or larger scarf, you will need enough beads for the number of fins plus 2 more.
- Yarn Needle
A note about the tutorial videos and the yarn
In the demonstration videos below, I use a worsted weight yarn merely to have larger stitches with better definition for you to clearly see what is happening. When making this scarf, your yarn MUST be Superfine weight yarn (Category 1) which is also known as sock yarn, fingering yarn or lace yarn. Thicker yarns will not give it the drape necessary for a scarf or shawl. The videos are not designed to teach you to do the individual stitches as it assumes you have prior knowledge. The videos are designed to help you understand where to do the increases and how to handle the slip stitches. If you are not comfortable with the front post double crochet used throughout, I highly recommend you view my tutorial on post stitches HERE and practice them before attempting this scarf.
Abbreviations and Explanations
- ch – chain
- slst – slip stitch
- hdc – half double crochet
- dc – double crochet
- fpdc – front post double crochet
- dc-inc – double crochet increase (do two dc in the same stitch)
- hdc-inc – half double crochet increase (two hdc in same stitch)
- beg – beginning
NOTE: this pattern uses increases to give it the vortex curl. Make sure you read the pattern carefully to note these increases. Most of the questions I get are because one or more increases were missed. Increases happen on every row but only on one EDGE of the row (the edge opposite the beadwork). So increases happen at the START of EVEN numbered rows and at the END of ODD numbered rows. There are two on the front and only one on the back. The increases work slightly differently depending on whether you are doing Section 2 or Section 3. The videos for each section will help explain this.
Preparation
If using decorative beading, thread all of the beads onto the yarn before you start. If you are not using decorative beading, thread one bead on if you are using a stranded yarn like the Garnmanufaktur Lola (as opposed to a plied yarn like the Scheepjes Whirl). This will help keep the stranded yarn from separating or tangling as you work. If you find it too cumbersome to work with all 19 beads on the yarn, then thread 5 or 6 on and then when they have been used, cut the yarn, thread more on, and rejoin the yarn using a magic knot.
Most of the Daughter of Dragons scarves I have made had 17 sections. A few had 21. You can make it as short or as long as you like, but it is important to have an odd number of sections so that you begin on Section 1 and end on a repeat of Section 3. this ensures the start and end are both made of the half-double-crochet stitches to give it the heft to hang well.
If you are NOT using beading, then replace the bead instructions on all R1’s with either a picot stitch (ch 4, slst to first ch) or simply ch1 and then do the slip stitches.
Section 1 (you will only do this section once)
This is the hardest section to do as there are so few stitches to start with and it is hard to tell which end will be the ‘fin’ or ‘beaded’ edge and which will be the curved edge. You might want to use a stitch marker to mark the curved end where all the increases are. Count carefully and go slowly in this section. Once each edge is defined, the pattern gets easier to keep track of!
R1: Ch 2, slip bead tight to ch, ch 2, slst into first ch of row, ch 4, hdc in second ch from hook, hdc-inc in next st, hdc in last ch, turn. (4 sts)
R2: ch 1 (does not count as first st here and throughout section), hdc in first st, hdc-inc in each of next two sts, hdc in each stitch to end (one stitch for this row, increasing for rows 4, 6 and 8), turn. (6 sts)
R3: ch 1, hdc in each st until last three sts, hdc-inc in 3rd stitch from the end, hdc in each of next two stitches, turn. (7 sts)
R4-8: Repeat rows 2 and 3 twice more, then repeat row 2 once more. (8 rows)
Stitch counts for Rows 4-8 of Section 1:
- Row 4 – 9 sts
- Row 5 – 10 sts
- Row 6 – 12 sts
- Row 7 – 13 sts
- Row 8 – 14 sts
Section 2 (repeated throughout)
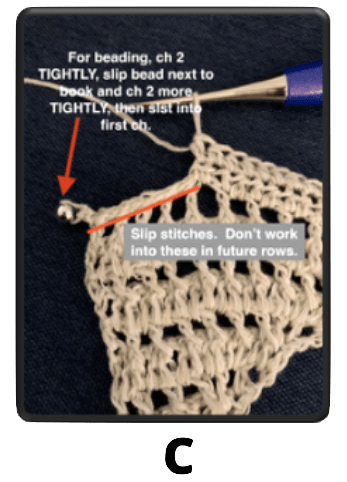
R1: ch2, slip bead tight to st, ch 2, slst in first ch, slst in next 8 stitches, ch3 (counts as a st), dc to last 2 sts, dc-inc, dc, turn. [See PHOTO C below]
R2: ch3, hdc in first st [the ch3 counts as both a hdc and the ch 1, combined with the hdc you’ve done in that first st, this will act as an increase st], ch1, fpdc around the second post in the row [from now on referred to as a st, but all fpdc are working around the post of the stitch], ch 1, fpdc in the same st [the fpdc, ch1, fpdc are all in the same st which then forms another increase], *(ch 1, sk 1 st, fpdc around next st) until you reach the last st of the row before the turning ch from the previous row, ch1, hdc in the ch space created by the turning ch of the previous row.
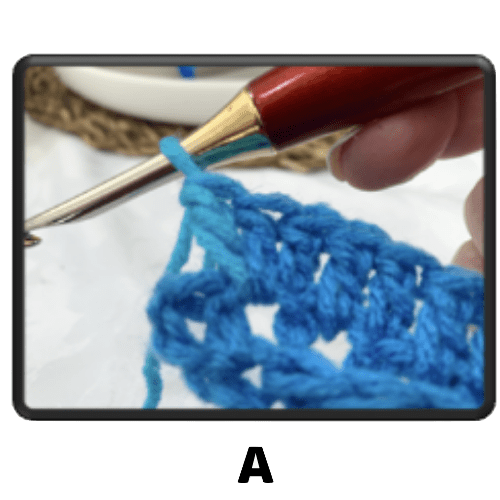
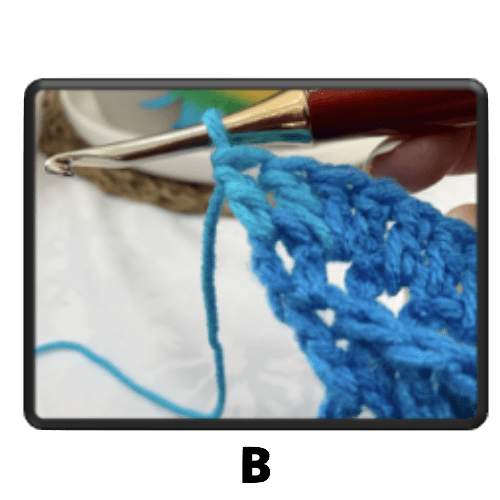
R3: ch3 (counts as first st here and throughout section), *(dc in ch space, dc in next st) repeat from * to second ch space from the end of the row, dc-inc in chain sp, dc in next st, dc in next ch space, dc in the space crated by the turning chain of the previous row, turn. [See PHOTOS A & B below]
R4-8: repeat rows 2 and 3 twice more, then row 2 again (8 rows).
Section 3 (repeated throughout)
R1: Ch 2, slip bead tight to st, ch 2, slst in first chain below bead [this is the first ch you did at the start] to anchor the bead in place, (slst in next st, slst in ch space) 4 times [total of 8 slsts], ch 1 (does not count as a st), hdc in each ch space and each st until you reach the second ch space from the end of the row, hdc-inc in ch space, hdc in next stitch, hdc in chain space, hdc in 2nd chain of turning chain, turn.
R2: Ch 1 (does not count as first st here and throughout section), hdc in first st, hdc-inc in each of next 2 sts, hdc in each st to end, turn.
R3: ch 1, hdc in each st until 3 stitches from the end, hdc-inc in next stitch, hdc in each of next 2 sts, turn.
NOTE: the first time this row is worked in the section, this row ends at the ch1 from the previous row…DO NOT work in the slip stitches. That does not apply, of course, to the repeats of this row in the section. See PHOTO C below.
R4-8: repeat R2 and R3 twice more then R2 again (8 rows).
To continue:
Repeat Sections 2 and 3 until desired length of scarf is reached. Every 6 sections you need to increase the number of slip stitches by 4 to make the ‘fin’.
- At the start of section 7, increase slsts after ‘ch2,bead,ch2, slst to first ch’ to 12 slsts.
- At the start of section 13,increase slsts after the beading to 16 slsts.
- If you make the scarf longer, then add another 4 slsts at sections 19, 25, 31, etc.
At the start of the very last row, add a bead so there is one on each tip of the scarf as well as at the ‘spikes’ of each fin. Use ch2, bead, ch 2, slst in first ch to add bead to this end.
Finish off. Weave in ends.
Congratulations! You have finished your
Daughter of Dragons Scarf!

Photos Referred to in Pattern:
PDF Fee Explanation:
* It has always been my policy to share my designs for free but sadly, people have taken advantage of this one. They have copied the pattern and sold it as their own design, or made minor changes to the pattern and sold that as their own design. Others have sold scarves they’ve made from this pattern without acknowledgement of the copyright. All three of these practices violate international copyright law. Sadly, it was done so often with this pattern that I have now have to charge for the pdf versions to protect the copyright as best I can. However, because I want to freely share my hobby, this website version will always be free and you do not have to purchase the PDF to make this scarf.

Marcus, Polly and Hugo, the dogs of Drunk Dog Creative, want to remind you to subscribe to this blog, share with your friends, and follow Drunk Dog Creative on all the socials.
Woof woof. Sit. Stay. Follow us. Good human.
AND ON RAVELRY!


Leave a comment