
I have to admit something that no maker would like to admit. I can’t tie bows. I mean, I can, but they do NOT look good enough to put on a papercraft project. They always turn out wonky and don’t stay together. My grandmother was a master bow maker – she used to sell Christmas wreaths in New Hampshire and everyone would flock to her house to get them. But me? Nope. She tried so hard to teach me and I just couldn’t get it right. I keep seeing all these cute cards decorated with adorable bows and I just look away. “Don’t even think about it,” I say to myself. How frustrating!
Then the other day I was browsing the website for Crafty Divas, a fabulous papercraft store a few hours away from where I live, and I came across the Zutter Bow-It-All (version 3). This may be the best impulse buy I’ve ever made. I have been involved in a flurry of designing cards that all need… bows.

I began to wonder if there were others out there like me… people who love ribbons and bows but just can’t seem to get them right? So, I decided to make a video of me using the Bow-It-All to show you what it’s all about.
Before we get to that, I do want to say that while I’ve provided links to the Crafty Divas website, I’m doing so only because I love the shop and the great customer service from Melissa. I also love to promote small businesses when possible. However, I am not receiving any compensation for this. I am also not receiving anything from Zutter. I’m posting this just to share something I’m genuinely excited about using.

There. Now that that is out of the way, let’s get back to bow making! The Zutter Bow-It-All v3.0 comes with a handy zip pouch that stores the machine and all its accessories. You get the base, the bow making pins, the handy helpers, and the swing out spool holders, as well as scissors and a little wrench for tightening the pins. The included instructions are really well done. The key is the ‘locking c knot’ which locks your bow in place and prevents it from being pulled out. It looks tricky when you read the instructions, but once you’ve done it a few times, you realise it’s pretty easy after all.
The Bow-It-All allows you to make single, double and triple bows which each bow wider than the one in front. It also lets you make bows with multiple loops the same size (my favourite at the moment!). The ‘helping hands’ pins are a genius idea that allows you to integrate a back ribbon behind the bow for tying around packages.
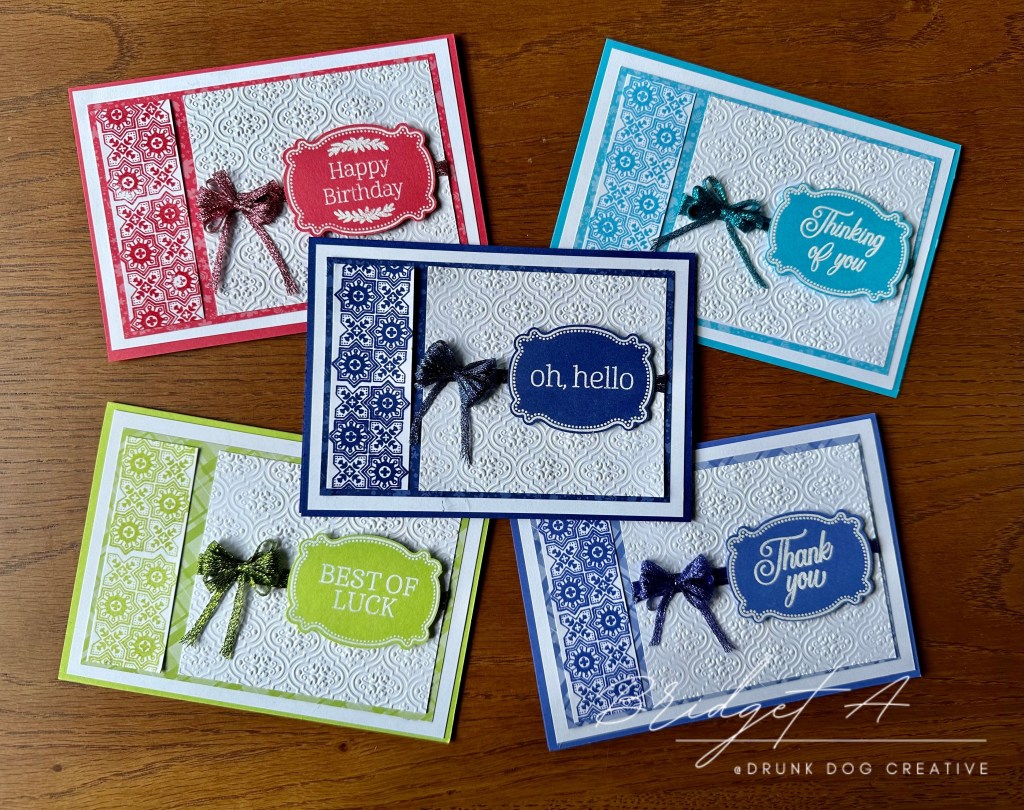
In the video I am using a very thin metallic bow – part of the Stampin’ Up! 2022-2024 InColour collection. I was able to make a very tiny multi loop bow with no problems at all. I even made one bow that uses all five ribbons at once! They are adorable and I can’t seem to stop making bows now!

So here is the video as promised. If you struggle with making bows, or just want a simple way to make them, try the Zutter Bow-It-All. By the way, it also makes tassles and pompoms. Watch for these on some of the future Drunk Dog Creative crochet projects!
It’s really that easy! Now go be creative! Happy making!
Love, Bridget A.

Marcus, Polly and Hugo, the dogs of Drunk Dog Creative, want to remind you to subscribe to this blog, share with your friends, and follow Drunk Dog Creative on all the socials.
Woof woof. Sit. Stay. Follow us. Good human.
Need supplies?
You can shop for Stampin’ Up! products at https://bridgeta.stampinup.net. You can also click on any of the items in the supply lists in tutorial posts. A percentage of any profit from my SU sales is donated to Dachshund Rescue Australia, so you get great products at a good price and help gorgeous dogs like Hugo find their furever home!
Join my team!
If you spend over $169 why not consider joining my team as an Independent Demonstrator? You will get $265 worth of your choice of products for only $169 and be entitled to a minimum 20% discount on your future orders. Many people join just to be Hobby Demonstrators for the personal discount!


Leave a reply to Split Embossing Technique for Card Making – Drunk Dog Creative Cancel reply