

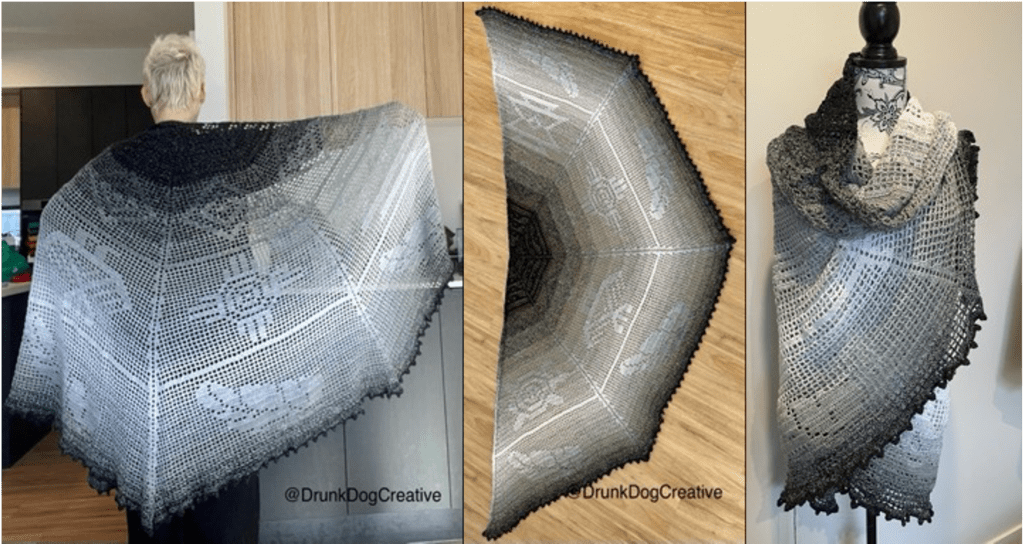
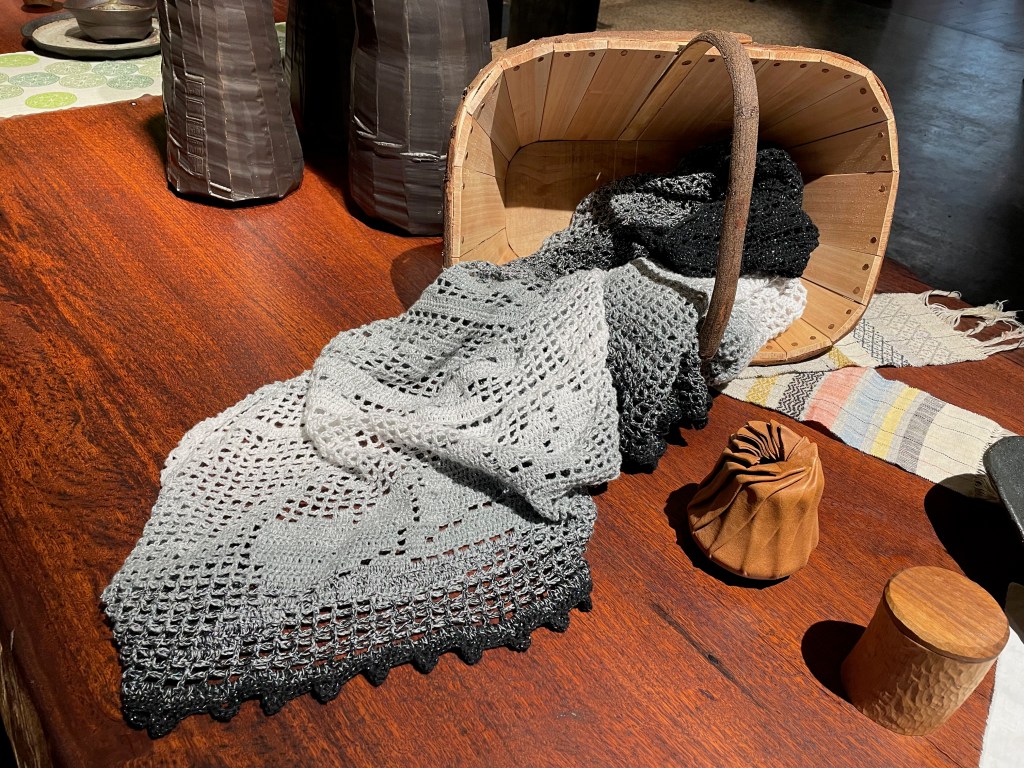
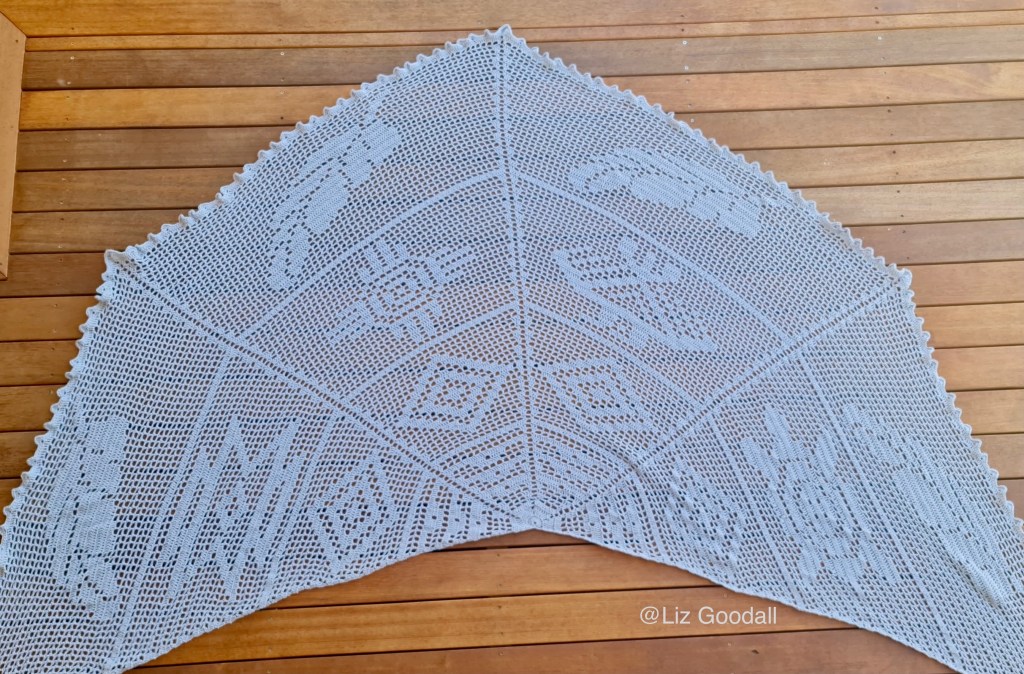
The Lost Heritage Shawl is a very large wrap around shawl (more like a cloak!) that is a modified version of fillet crochet and features Native American motifs. It is also much more than a crochet pattern – designing this has been a journey into my own lost heritage. I was born in California, USA (though I live in Australia now) and was adopted at birth. I have had a lifelong fascination with all things to do with Native Americans especially in the West and Southwest (history, folklore, art, etc). I never understood it as I look about as white as you can get. 13 years ago, my birth mother found me after a lifetime of looking for me. We are now very close, and I call her Mom. A year after that, I told her about my fascination with Native American history and she told me that her grandmother was Native American but they knew very little about her as her father left when she was a child. Thus began a long journey to find my ancestors. A few years ago, my daughters gave me the Ancestry DNA test for Christmas. It did reveal a very small percentage of Native American ancestry but still no concrete answers. It wasn’t until 2021, when there was another database update, that I got connected to ‘cousins’ that were from that branch of the family tree. In making contact with them, and through other documents, I found the definitive links to my ancestors – the Choctaw Tribe, now based in Oklahoma. My 4th Great Grandfather is Basil LeFleur who was Chief and Governor of the Choctaw Nation in the 1800s. So began my journey into understanding that part of my heritage. Designing this shawl was part of that process – the reclaiming of my lost heritage.
Recently I was honoured to be asked to exhibit the original shawl at CraftLab22 – a major exhibition for makers as part of the annual Ballarat Heritage Festival in Ballarat, Australia (where I now live). This event attracted several thousand visitors and featured works by both Indigenous and non-Indigenous makers.
I hope you enjoy making this shawl as much I enjoyed designing it. May you be blessed by its warmth, comfort and meaning for your own life.
A few notes about the pattern….
As this pattern is a modified version of fillet crochet, it consists mainly of charts. If you prefer an add-free, printable, pdf of this pattern, you can find it HERE for a modest fee. The pdf has each chart on a full page which makes it easier to read than on the screen. The pdf also comes in US and UK crochet term versions while the free pattern here is only in US terms.
Basic & Modified Filet Crochet Technique – please read this before making this pattern!
Basic Filet Crochet Technique
Filet crochet uses a series of blocks to create designs. Each block is either an ‘open’ block made using chains and skipping stitches or a ‘closed’ block made using double crochet stitches. Instructions for filet crochet are not written out. Instead, you follow a chart. A block that is filled in with a colour is a ‘closed’ block while non-coloured blocks are ‘open’ blocks.
Each block = group of 4 stitches
- Closed block = 4 x double crochet
- Open block = double crochet, 2 chains, double crochet (total of 4 stitches)
Each block is framed by a double crochet at the start and end with the last double crochet of a block ALSO being the first double crochet of the next block.
If there are two closed blocks together, the framing double crochets only count once so if there are 2 closed blocks it would have 7 double crochets (not 8) and three in a row would be 10 double crochets not 12. More detailed explanations are on the next page if you need them.

The chart above shows the open and closed blocks. If the rows were written in normal crochet language, they would look like this:
Foundation: Ch 22f
Row 1 (right to left): dc in 4th ch from hook, dc in each ch to end, turn. (19 dc total which makes 6 closed blocks… often in filet crochet the first and last row are made up of all closed blocks to give some structure to the project).
Row 2 (left to right): ch 5 (counts as first dc and ch 2), sk 2 sts, dc in next dc below which is the 4th dc from the start (first open block made), *ch 2, sk 2, dc, repeat from * 4 more times with the last dc made in the 3rd ch of the turning chain, turn.
Row 3 (right to left): ch 5 (counts as first dc and ch 2), sk ch2 space below, dc in the dc the row below (first open block made), 2 dc in the ch space, dc in the dc below (closed block made), ch 2, sk 2, dc in the dc of the row below (open block made), 2 dc in the ch space, dc in the dc below (closed block made), ch 2, sk 2, dc in the dc of the row below (open block made), ch 2, sk 2, dc in the 3rd ch of the turning ch (open block made), turn.
Row 4 (left to right): ch 3 (counts as first dc), 2 dc in ch space, dc in dc below (closed block made), ch 2, sk 2, dc in dc of row below (open block made), ch 2, sk 2, dc in dc of row below (open block made), 2dc in chain space, dc in dc below (closed block made), 2dc in chain space, dc in dc below (second closed block made), ch 2, sk 2, dc in 3rd ch of turning ch (open block made), turn.
As you can see, the last dc in a block is ALSO the first dc of the next block. So in Row 3 where there are 2 closed blocks together, you do 7 dc’s, not 9. If there were 3 together you would do 10 dc’s rather than 12.
So, an open block is ‘framed’ by a dc at the start and end – each in the dc of the row below – and ‘filled’ by 2 chains that ‘skip’ over the chains or dc below. A closed block is also framed by 2 dc stitches – each in the dc of the row below, and ‘filled’ by 2 dc stitches made in the space formed by the ch2 below.
There is an excellent tutorial at https://www.thesprucecrafts.com/learn-the-basics-of-filet-crochet-4062606 which explains the basics.
Modified Filet Crochet to maintain the structure of the Shawl
The structure of this wrap is made up of four ‘wedges’ with each wedge separated by a ch2 space. A single row goes across all four wedges, but instructions and charts give you the instructions for one wedge, which is then repeated across the next three wedges… with the exception of one section which has a different motif in each wedge (more about that later).

Each wedge starts and ends with a dc-inc with a ch2 between them. This is why the filet is ‘slightly modified’ … to allow for the increases which give the wedges their shape.
To make the space between wedges, each row contains a dc-inc at the start of each wedge and ends wedges 1, 2 and 3 with a dc-inc, ch 2. (Any row that begins on Wedge 1 or Wedge 4 begins with a turning chain of 3 chains AND a dc in the first stitch. This ch3-dc is the equivalent of a dc-inc.) At the start and end of each wedge there will either be a [dc-inc] or a [dc, dc-inc] or a [dc, dc, dc-inc]. this allows the shawl to increase in size in each row and allows us to add in other open or closed blocks. Once a wedge has a [dc, dc, dc-inc], the next row would be only a [dc-inc] and the then an open or closed block would be added.
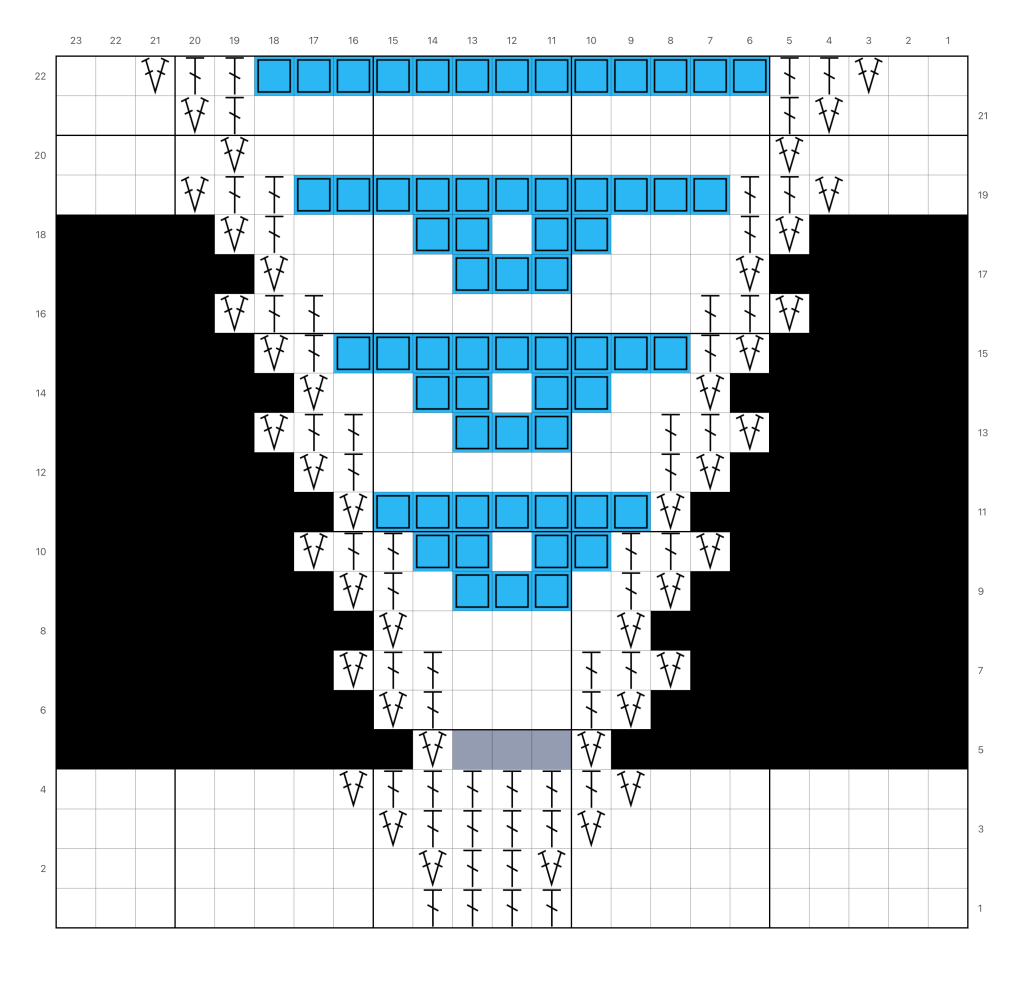
Because we are combining these increases with fillet crochet, and fillet crochet uses charts instead of instructions, I’ve had to modify the charting somewhat. Each chart will show the number of dc’s and dc-inc needed at the start and end of each wedge for that row. It is vital to remember that the first or last stitch of the block is ALSO one of the dc’s on the chart. Do not double these up. For example:
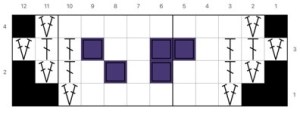
In this chart, the first dc of the first open block of Row 1 is the second dc of the dc-inc. The last dc of the last block is the first dc of the dc-inc. On the 4th row, the dc’s are replaced with another block. (the black squares indicate that there are no stitches there).
So, in between each wedge, there will always be one of the following ‘increase connectors’:

- dc-inc, ch 2, sk ch2 sp below, dc-inc
- dc, dc-inc, ch 2, sk ch2 sp
- below, dc-inc, dc
- dc, dc, dc-inc, ch 2, sk ch2 sp below, dc-inc, dc, dc
On the charts, the ch-2, sk ch2 sp below is not shown. You must always add that in between wedges 1-2, 2-3 and 3-4.

Materials
Yarn: Garnmanufaktur Lola – 2 x 300g cakes. Note: Lola is a 4-strand, superfine/fingering weight yarn that is a cotton/acrylic blend. Any yarn thicker thank this will be too heavy and too large.
Hook: 3.5 mm
Yarn Needle
Gauge: 13 rows x 10 fillet squares per 4” (20cm)
Abbreviations
- ch = chain
- sc = single crochet
- dc = double crochet
- st = stitch
- sk = skip
- sp = space
- sc-inc = single crochet increase (two single crochets into the same stitch)
- dc-inc = double crochet increase (two double crochets into the same stitch)
Instructions
Foundation
Make a magic circle.
R1: 16 dc into the magic circle, close the circle, turn.
R2: ch 3, dc in first st (which counts as first dc-inc of the row here and throughout pattern), dc in next 2 dc, dc-inc, ch 2, *dc-inc, dc in next 2 sts, dc-inc, ch 2, repeat from *twice more, dc in next 2 sts, dc-inc, turn.
R3: ch 3, dc in first st, *dc in next 4 sts, dc-inc, ch 2, sk ch2 space below, dc-inc, repeat from * twice more, dc in next 4 sts, dc-inc, turn.
R4: ch 3, dc in first st, *dc in next 6 sts, dc-inc, ch 2, sk ch2 space below, dc-inc, repeat from * twice more, dc in next 6 sts, dc-inc, turn.
There should now be 4 wedges with 10 stitches in each wedge across R4 and ch2 spaces between wedges. This is a total of 40 dc and 3 ch2 spaces. You are ready to begin making the filet blocks.

Section 1 (Rows 5-21): Sky Band – “Leading to Happiness”

Section 2 (Rows 23-46): Medicine Woman – “Wise / Watchful”

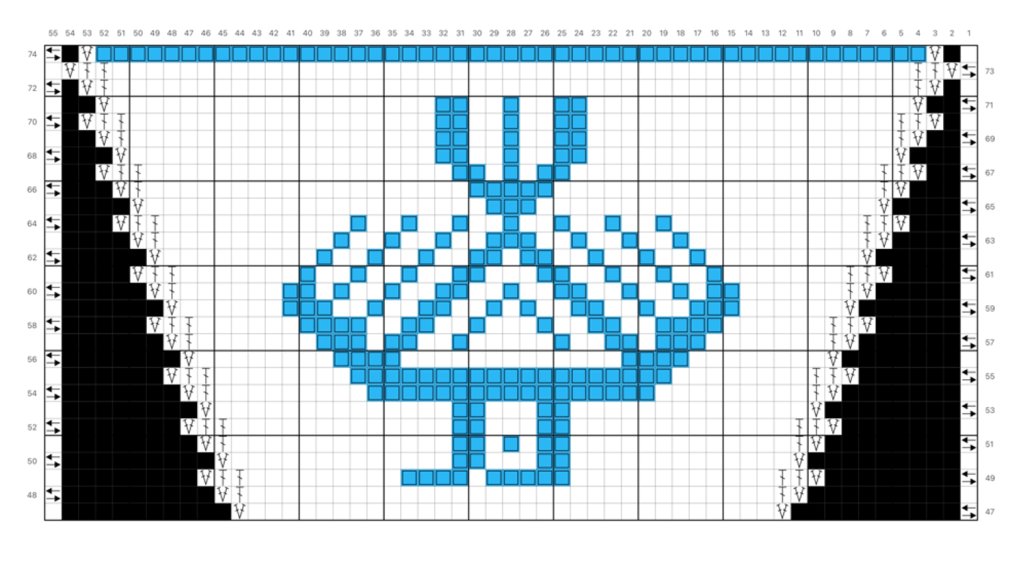
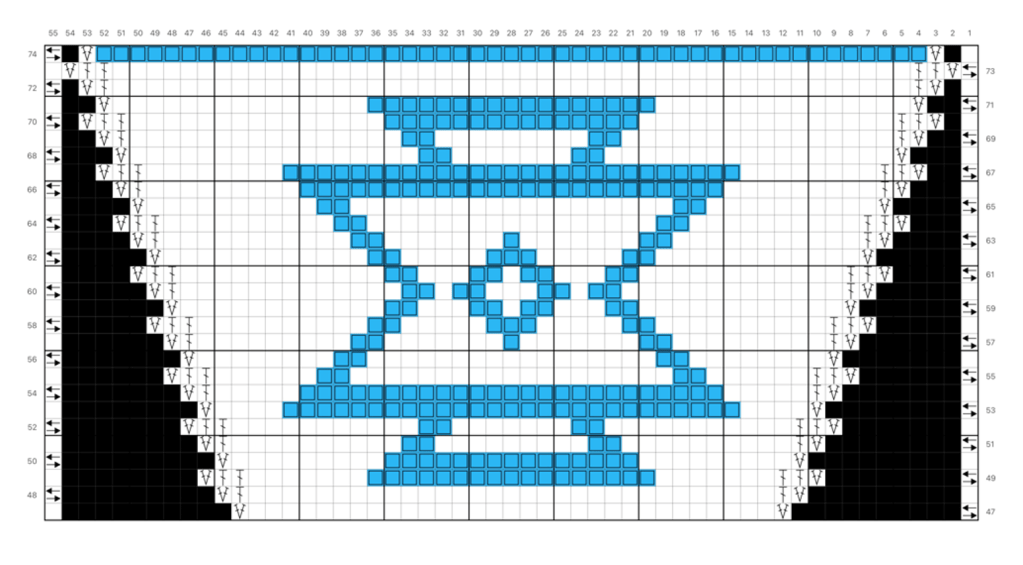
Section 3 – (Rows 47-74): 4 Motifs which include (from RIGHT to LEFT in the chart below)…
- 3A – Turtle – “Perserverance”
- 3B – Eagle – “Honesty, Truth, & Power”
- 3C – Sun Symbol – “Happiness”
- 3D – Butterfly – “Everlasting Life”
This section has 4 motifs – one in each wedge. The chart below is only to give you an overview of the four wedges but does not provide the detail needed to crochet it as there is a maximum size for the chart in the software and it will not allow for all the stitches and blocks to be included. Plus at this size, the boxes are too small to easily follow the pattern… at least for my aging eyes!
On the following pages, charts are given for each wedge which are larger (so easier to see) and contain all of the details necessary. When working a single row, you need to move from chart 3a to 3b to 3c to 3d before doing the next row (which then moves from 3d to 3c to 3b to 3a).


Section 3A: Turtle (Perseverance)

Section 3B: Eagle (Honesty, Truth and Power)
Section 3C: Sun Symbol (Happiness)

Section 3D: Butterfly (Everlasting Life)
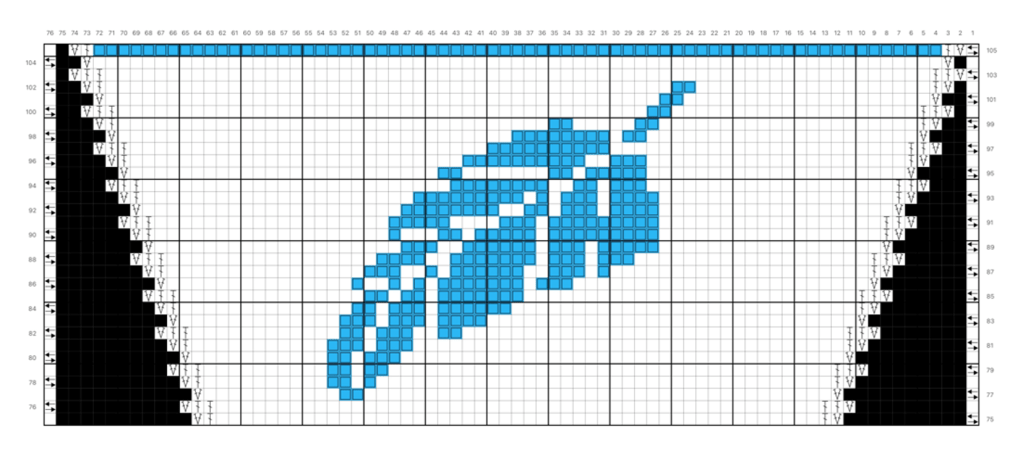
Section 4: Feather (Courage, Wisdom, & Strength)
Edging
Note: The edging is worked in normal crochet terms. It is not in fillet crochet. At the end of the last section, you should have 212 dc sts in each wedge with a ch2 sp between wedges.
R1: Ch 1 (does not count as a st), sc-inc in first st, *sc in each of next 7 sts, ch 3 [do not skip any stitches], repeat from * 28 more times (29 chain ‘peaks’ made), sc in next 5 sts, hdc in next 2 sts, dc-inc in next 2 sts, 3 tc in ch sp, [217 sts (214 plus 3tc between wedges) plus 29 chain ‘peak’ spaces…first wedge finished],
**dc-inc in next st, hdc in next 2 sts, sc in next 5 sts, ch 3, *sc in each of next 7 sts, ch 3, repeat from * 27 more times (29 chain ‘peaks’ made), sc in next 5 sts, hdc in next 2 sts, dc-inc in next st, 3tc in ch sp, repeat from ** once more [3 wedges now made]
dc-inc in next st, hdc in next 2 sts, sc in next 5 sts, ch 3, *sc in each of next 7 sts, ch 3, repeat from * 27 more times, sc in next 7 sts, sc-inc in last st, turn. [865 sts plus 116 chain ‘peak’ spaces total]
R2: ch 1 (does not count as a st), sc-inc in first st, sc in next 7 sts, sk 1 st, [2hdc, 3dc, 2hdc ] in ch3 space, *sk 1 st, sc in next 5 sts, sk 1 st [2 hdc, 3dc, 2hdc] in ch3 space, repeat from * 27 more times, sc in next 5 sts, hdc in next 2 sts, dc in next 2 sts, 3 tc in next st [218 sts (215 sts plus 3tc) plus 29 peaks…first wedge finished],
**dc in next 2 sts, hdc in next 2 sts, sc in next 5 sts, *sk 1 st [2hdc, 3dc, 2hdc] in ch 3 space, sk 1 st, sc in next 5 sts, repeat from * 28 more times, sc in next 5 sts, hdc in next 2 sts, dc in next 2 sts, 3 tc in next st, repeat from ** once more [3 wedges now made]
dc in next 2 sts, hdc in next 2 sts, sc in next 5 sts, *sk 1 st [2hdc, 3dc, 2hdc] in ch 3 space, sk 1 st, sc in next 5 sts, repeat from * 27 more times, sk 1 st, [2hdc, 3dc, 2hdc] in ch3 space, sk 1 st, sc in next 7 sts, sc-inc in last st.
Fasten off. Weave in ends.
Finished!
Don’t forget to share your wonderful creations on Ravelry and Socials! Tag DrunkDogCreations so I can see them and/or use these hashtags: #DrunkDogCreations #LostHeritageShawl
A big thank you to….
I owe a very special thank you to the five wonderful ladies who tested this pattern for me. I am indebted to them for finding the mistakes and helping to fix them. What a joy it was to work with these women!
- Mira Dixon
- Liz Goodall
- Helen Linning
- Sue Price
- Colleen Salter
If you live in Australia and are looking for the yarn used in this pattern – Garnmanufaktur Lola – then I highly recommend Bellemae Yarns. Yasmin is incredibly helpful, has a huge selection of Garnmanufaktur and Scheepjes yarns and all sorts of other goodies. And just wait till you see your package when it’s delivered. It’s very special. (Note: I do not receive any compensation for this recommendation. It comes from my heart.)
Copyright Information
So, this is the legal stuff that we all wish we didn’t have to do but unfortunately in the world we live in, we do. Please kindly read this so you understand your obligations to respect the copyright and what that means.
This design, pattern, and instructions are copyrighted. Photos in this pdf, on my website, on Ravelry, and on my social media sites, belong to me or to the person credited.
** Copyright Statement**
This design and written pattern are the intellectual property of Drunk Dog Creative and Bridget Aitchison. You may print this pattern as needed for your own personal use only. You MAY NOT reproduce this pattern in part or in whole in any form for any other purpose without express written permission from me. By purchasing and/or downloading this pattern, you agree not to e-mail, give, or share this pattern in any other way to anyone else. This includes sharing the pattern for free. You agree not to make any video tutorial and upload to YouTube or any other blogs or web pages to show how to make this pattern. You agree not to translate this pattern into any other language or convert it into graphs or symbol charts. You agree not to create a pdf of the free version of this pattern found on my website for the purposes of providing it to another person, either for sale or for free. You agree to not create another pattern which borrows substantially from this pattern. If you create another pattern that relies on small parts of this pattern, you agree to give credit by stating, “…based on the [INSERT NAME OF PATTERN] pattern by Drunk Dog Creative.” You may, however, sell what you make from this pattern, but you may NOT use my photos to sell your item. Any items made from this pattern that are offered for sale must give pattern design credit to Drunk Dog Creative. When sharing your work made from this pattern via any online platform, please provide a link to my Ravelry store, my website, and/or my social media pages. If you obtained this pattern through any source or individual other than Drunk Dog Creative or one of our authorized distributors, then it is an unauthorized and illegal copy. Please support designers by purchasing or downloading legally. Thank you!


Leave a comment